Sunday, October 11, 2020

What's in Yours?

Hubby and I are huge science nerds.  We grew up in the age of moon landings, Star Trek, and Space Invaders, so it’s no secret that we are also fans of NASA. Today, Mark stumbled across a fun article relating to the Artemis program, NASA’s current program to send the first woman (and the next man) to the moon. The mission itself is pretty exciting, but one of the things that particularly caught our eye was the “What’s in Your #NASAMoonKit?” promotion.

Astronauts who travel to the International Space Station are very limited on what personal items they can bring with them into space.  Each astronaut is allowed a “personal preference kit” that takes up a maximum volume of 5” x 8” x 2”.  For the record, that’s smaller than this Creative Memories paper trimmer.


What would you put in your personal preference kit?  NASA invites you to think about what you would take to the moon and share what you would put in your #NASAMoonKit on social media. Take a picture or video and post it with the hashtag #NASAMoonKit on Instagram, Twitter, or Facebook. If they like it, NASA might share your kit on their own social media accounts or their Green Run broadcast.  Oh, and don't forget to tag @CraftyNeighbor and #craftyneighbor. I’ll be posting mine to Instagram and Facebook sometime in the next few days!


For all the rules, check the official “What’s in Your #NASAMoonKit?” website. 


Saturday, October 10, 2020

Craft Your Stress Away


Today is World Mental Health Day, and I can’t help but think that we could all use a day to pay a little bit more attention to our stress levels and spend a little more time giving ourselves some self-care. This year has been…shall we say “bizarre”…to say the least. My stress levels are so high my ears are ringing and I have to keep reminding myself to relax my neck and shoulders. Sadly, it doesn’t look like it’s going to get any better any time soon. Ugh. Everything is being cancelled, done virtually, and just messed up in general.  They’re even discouraging Halloween festivities. Luckily for us, we are crafters, so we have some great de-stressing tricks and treats (see what I did there?) right at our fingertips, so I’m here today to remind you about a few of them.

1. Craft with friends

My household can be a bit chaotic even on a good day.  With three (sometimes four) adults and two dogs, there’s always some kind of noise and commotion. I like to get away to crops and retreats where I can tune out all that mess, but with COVID, that’s just not possible. Back in March, when we weren’t able to meet in person any more, we started doing some Zoom crops (weekly on Thursdays, and frequently on weekends, too). It’s been a tremendous stress release to be able to chat with my friends, especially when we all come to realize we all have the same hopes and fears about this crazy situation. You can start your own Zoom meeting, open a Facebook “room”, or use any number of other online meeting options.  You can even join our weekly meetings; the info is available in our Crafty Neighbor Facebook Group: Crop and Craft Events. That’s where we post all of our virtual and (hopefully some day) in-person events from now on.

2. Do something mindless

Since I can’t go anywhere to get away from the stressful things in my life, I’ve started to think instead about things I can do right here at home, and that usually means veg’ing out on TV while doing something quiet and mindless. Zentangle, doodling, and coloring are great options, as is sewing the binding on a quilt, or even just cutting your scrap paper down to card or photo mat sizes. I have spent many an hour rolling balls of yarn and spools of ribbon. Just find something simple that you don’t have to think too much about.

3. Go for a quick victory

One sure-fire way to feel better is to give yourself an easy win. Finishing an unfinished project, cleaning out a drawer in your craft room, putting those finished layouts into albums, or even jotting down some ideas for your next project are all great ways to boost your mood. By checking off a task on your to-do list, you give yourself an automatic check in the “win” column, and that always feels good. It doesn't have to be a big undertaking…completing even the smallest task is enough to get the endorphins going. 

So the next time you’re feeling down in the dumps, or anxiety is making you pull your own hair out, treat yourself to one of these crafty (and fun) techniques to kick that stress to the curb! I know you’ll be glad you did! 

Tuesday, October 6, 2020

Wedding Invitations


I know I promised this a long, long time ago, and I thank you much for waiting so patiently while we got through a whole bunch of stuff. It was just too much for Christen and I to do all this work on the wedding AND find time to blog about it. I did make sure to take lots of pictures, so I hope you’ll think it was worth the wait as I start on this series of wedding posts. So without further adieu, I would like to share the invitations we made.
 

Christen and Travis chose to wait about a year before getting married so they could have time to save up for the big day and to give us plenty of time to make all the crafty things we wanted. They found the perfect venue soon after, and we kept getting asked whether they had set the date, so we decided to send out “Save the Date” cards.

I designed these myself in Photoshop, using several fonts I downloaded from the internet. These included Lightfoot ShadowedSafina FancyJazz LETPlaybillDakota, and Little Lord Fontleroy. I also used Helvetica font, which usually comes installed on most computers.

For printing, I sent my postcard to Got Print, my go-to printing company. They offer fast, convenient service, highly competitive pricing, and they even have a facility right here in North Texas. Before sending your designs for printing, you’ll want to make sure you have designed the front and back as two separate files. You may need to convert to CMYK color, so be sure to read the instructions carefully for the optimal file format and observe the bleed marks, etc. We chose full color on both sides 4”x6” standard postcard on 14 pt. Uncoated Cover paper. Choose the online Instant Processing Proof to speed up the service and keep the costs down. We paid $31.88 for 100 postcards, including tax and shipping. Larger orders offer greater savings.

We had a lot of ideas about the actual invitations, but after months of playing with a Silhouette cut file that wouldn’t cut all the way (just too intricate at that size), we gave up and ordered this die set from Amazon*. We made about 130 invitations in all, and it took us a lot longer to cut out than we had estimated. For one thing, this tiny intricate die didn’t always cut well. We wound up having to use a shim and we had to stop frequently to cut wax paper with it a few times to help it release the little bits and pieces. There are so many tiny pieces in this design that it literally shredded my Sizzix Die Brush Tool*. After that, we tried a soft-bristled toothbrush before we settled on a stiff brush from my Sonic Scrubber*. The combination of the stiff bristled brush and the above-mentioned wax paper worked well, if a bit slow.


The die we used comes in two pieces, as shown. One cuts the pocket and the other is an edge die, which has a score mark to be placed against the fold-line of your trifold invitation. This particular die was designed to create a 4" x 6" card -- NOT the standard A2 (4 ¼" x 5 ½") card most commonly used in the U.S. We searched all over for a die to make the right size, to no avail. So we decided to make do with this one. The problem we found with this was that it was very difficult to get the score marks exactly perpendicular to the length of the card and exactly where it needed to be scored since we couldn't line up the edges of the die perfectly. Rather than try to precisely place the die on the fold, we chose cut the paper into 5 ½” x 12” strips and used the die on one end. Once it was cut, we could score at the edge of the die-cut area and fold it inward before trimming to the desired length…in this case, a standard 4 ¼” x 5 ½” card. So basically cut first, score, then trim.


The pocket die also contains score lines to help with construction. Simply fold the tabs inward and add adhesive before sticking it to the right-hand flap of your card. I used ¼” Scor-Tape* for a sturdy hold. 


The remaining parts inside the card were printed on my laser printer using Stampin’ Up Very Vanilla paper and a brown-toned ink using the following fonts: Imprint MT ShadowBell MT, and Octavina Swash. The Octavian font came as a bundle I purchases a while back from FontBundles.net, however it is also available for free on various font websites. The paid version offers contextual and stylistic alternates for many of the letters. We also added a text embellishment from the Type Embellishments One LET font. Embellishments like these are fun to play around with, and sometimes you can create lovely embellishments by combining two or more into a single arrangement. 


Inside the card, we included the formal invitation (on the left) and a Details card and the RSVP card in the pocket on the right. Right before we sent the invitations, we decided to also add a COVID statement/request as another item in the pocket to remind our guests to wear masks. 

The invitation was held together with a 1” belly band, trimmed to size. The “buckle” on the band was created with Mirri Lava metallic rose gold paper from The Paper Cut and the Artisan Label punch from Stampin’ Up. The punch is discontinued, but there are many fine dies and punches that would work just as well. The inner part of the buckle was printed on Stampin’ Up Very Vanilla on my laser printer using the Little Lord Fontleroy font again. I simply built the design using multiple layers of boxes and text boxes, moving each layer around until I had it where I wanted it. It’s hard to tell from the photo, but it was actually printed in black and then Travis (my new son-in-law!) ran it through my Heidi Swapp Mini Minc* to foil it in Teal*.


The other products we used to create the invitations were:

Bazzill paper in the color Blue Oasis, which I ordered from my good friend and former Crafty Neighbor instructor, Karrie Allen at Scrapp’n Savvy in Conroe, Texas.


Kraft Cardstock Paper from Hobby Lobby* 


One more little thing...because of the weight and thickness of the complete invitation, we had to add more postage when we took them to the post office.  My advice...put them all together and take one to the post office to be weighed before you put any postage on them...there might be a single stamp in the right denomination!


I hope you’ve enjoyed this little tutorial on making these lovely and lacy wedding invitations!  I’ll be posting more of our wedding crafts and other tips and projects soon. Don’t forget to like and subscribe to this blog so you don’t miss out!

*Here are links to many of the products I used. As an Amazon Affiliate, I earn from qualifying purchases.

&nbsp &nbsp &nbsp &nbsp &nbsp &nbsp


Monday, September 28, 2020

2019 December Daily

 I just spent the weekend in my old hometown working on getting my mom’s belongings moved into storage. I can’t remember if I posted about it (pretty sure I did), but Mom has been living with us since January. She has dementia, and her care occupies a lot of my time. I’m not quite sure how we did it, but my daughter, Christen, and I somehow managed to pull off a really nice wedding with tons of handmade decorations, bouquets, and more. And all of it while we were under lockdown and social distancing orders due to COVID-19. I’ve been trying to get around to posting more of those projects, but it just hasn’t happened yet. So all this to say that I finally found a solution, and I’m hoping there will be more posts on here soon, and that they will be more regular in frequency!

One of the projects I’ve been meaning to get around to posting is my 2019 December Daily project. This was the first time I’ve participated in the popular challenge hosted by Ali Edwards, and I have to say I had the besttime! I finished my album in January, and I even recorded a flip-through video, but then I never could find the time to edit it. Now the 2020 December Daily project is fast approaching and it seems like everyone is posting their flip-throughs as part of the #donebydecember challenge created by Ali’s design team. The idea was to prompt everyone to actually finish their projects, and it guilted me into finally editing this video while traveling home.


Sorry for the lighting…it’s a work in progress! Here’s some still photos of some of the projects:


I hope you enjoyed my little flip-through and I hope you’ll come back for more crafty projects here on my blog and on my YouTube channel. Until then, I’d love to hear about some of your unfinished projects. Tell us about it in the comments below!


Thursday, July 30, 2020

I Can Do That!

Hello crafty neighbors! I hope you are staying safe and healthy through all this crazy COVID situation, and if you are sheltering at home or working from home, I hope you’re not going too stir crazy.  It’s been a strange few months around here.  It seems like time is both speeding by and at a dead standstill. I don’t know how that’s possible, but it sure feels like the year is whizzing by, even though the days are all the same. My husband calls it “Blursday” because it’s often hard to tell what day it is -- the days all run together. In many ways, I feel like we are still in March, so how can it be near the end of July? What happened to all the time in between?
While nothing is really back to normal around here, we have managed to settle into some routines that help. Hubby is mostly still working from home, but he does have to go in from time to time.  We still aren’t allowing visits in our home from friends and family with the exception of my daughter and her soon-to-be family – we have too many wedding details to manage, so she really must be here. The wedding details have kept us super busy all summer, and I feel really bad that I haven’t kept up the blog posts about it as I had promised. Luckily, we’ve done so much work, I have plenty of material to do posts with, so I’m hoping to get back into the habit of sharing those details here.
My most recent wedding projects have been making all the floral arrangements. We opted to do our own rather than spend a fortune on fresh flowers that wilt in a day. I  had long admired the beautiful brooch bouquets I saw on Pinterest, so we thought we’d give that a try. You can see some of the one’s we liked on my Pinterest board here
I started by ordering a large variety of brooches on Amazon.  I’ve linked below to some of the ones we found. I was really surprised at how inexpensive they were, but a little bit disappointed in the availability of brooches in rose gold. Most of what we found was traditional gold and silver, and with the tiny pictures that are often used, it can be hard to tell. Some of the brooches we ordered looked rose gold but turned out to be gold instead. It was okay, they still worked, but that was not what we were looking for.
Actually starting on making the bouquets was a bit daunting, and I kept putting it off as long as I could because I’ve never really done any floral arrangements and I wasn’t sure if I had the skills. In actuality, it turned out to be quite fun, and I think I did a pretty good job of it for a novice. I think the hardest part was settling on the design – there are so many ways to do it! 
We originally planned to use the wooden dowel and Styrofoam ball method, but the more I looked at those, the less I liked that perfectly round design. An alternative was to buy plastic forms, which were ok, but didn’t really match the esthetic of Christen’s country chic theme. Besides, it would mean yet another trip to Michael’s or Hobby Lobby, and we wanted to save money. We settled on a more natural look using the faux stems on some pretty little floral bundles we bought at Michael’s. If you’re being ultra frugal, you could use these just the way they are; they were tied up with raffia and are pretty much a bouquet in their own right. You could add a bit of ribbon or lace to dress it up and you’re good to go.
We wanted to add a little more variety to the flowers, but we liked the faux stems on these. Luckily, they slide right off and can be used on pretty much any floral stem. When I had the shape and flower placement the way I wanted, I bundled them off with rubber bands to hold them in place and started adding the rhinestones.
There’s a lot of variation in brooch bouquets…everything from all brooches and no flowers to all flowers with just a few brooches. We wanted a mix of both. There are also several different methods of adding rhinestones to the flowers. Originally, we planned to turn the brooches into floral stems by wrapping floral wire through them.  This method works really well if you are using the Styrofoam base, but not so much for bundling with natural or faux flower stems. Instead, we used the more common hot glue method, and it worked very well since we had a mixture of brooches of different sizes, both with and without pin backs.
The first one I did was the tossing bouquet, since it is often a smaller, simpler version of the bride’s bouquet. I figured it would be good practice and it would be okay if it was less than perfect. Once I made that one and was satisfied with how it looked, I had the confidence to proceed with the others. I sorted the remaining flowers until I had a good mix for each of the three remaining bouquets (Maid of Honor, Matron of Honor, and the Bride), and bundled the flowers as I had done with the tossing bouquet.  Adding the brooches was quick and easy and I had them done in no time. I started with the largest brooches first, then filled in gaps with smaller and smaller pieces until I was satisfied. I can see how easy it would be to fill the whole things up with brooches!
[Hot glue tip:  To prevent those spider-web strands of glue on your projects, let go of the trigger and whip the gun in a circle like you’re beating eggs before pulling away from the project.]
The finishing touches on the bouquet were lace handle wraps.  The bride’s bouquet was wrapped with a David Tuterra wrap we bought at Michael’s (don’t forget to use your coupons!). I wrapped the others in lace we had on hand, turning the cut edge under and hot gluing it into place. I added pretty ribbons and a bow, and they were done.


I’m really proud and excited about these bouquets, especially since I had never done anything like this before. It was super simple to do, costs hundredsless than any brooch bouquet you could buy online, and it gave me the confidence to do the other floral arrangements we needed. I hope this gives you the confidence to make one, too!

To view a list of the brooches we purchased on Amazon.com, view our list here.

Friday, May 1, 2020

My Month in Quarantine (Part 3)

Happy National Scrapbook Day to all my crafty friends and followers!  I hope you are finding ways to be both crafty and social (in a safe way) today! I am currently enjoying a virtual retreat with some of my friends using Zoom, so I'm in my PJs, and snacking on a little taco dip and veggies.

A day or two ago, I mentioned a project I've been working on during this coronavirus lockdown.  So today I wanted to give you a little peak. On one of our wedding work days, Christen and I were talking about COVID-19 and what an unprecedented time in history this was (this was before the order to stay home). Not unlike the Spanish Flu epidemic in the early 20th century, this time in our lives was something that people of the future would not understand unless we spelled it out for them -- you just can't grasp the scope of something like this from a textbook or a few photos. So we decided that it was important to keep a COVID journal to document our lives during this time.  We are, of course, documenters and storytellers...that's why we scrapbook, right?

So in discussing this with one of our friends, we decided we needed to make a challenge of it.  We needed to come up with daily prompts a la Layout-a-Day, that would keep us all motivated and inspired to tell our stories.  I'm a little bit embarrassed to admit that I went back to an old Layout-a-Day list from the days when it was owned by Lain Ehman, and I repurposed that old list (with a few changes, of course) to be used for what we called our Stay-at-Home Challenge. For the entire month of April we had daily prompts (via automated emails) that led us through creating a journal of our time in "quarantine". The experience has been fun, creative, inspiring, and even a bit enlightening as we explore the many aspects of this pandemic and its affect on our daily lives. 

We all worked in different formats, including pocket pages, traditional scrapbooking, traveler's notebooks, and even Happy Planners.  I decided on a travelers notebook, and since this little challenge was something of a last-minute affair, I didn't have time to order one online, so I made my own.  (I may do a post about that soon!) I love the traveler's notebook because it's basically a blank slate, and it's just the right size for either journaling or photos. I've actually already filled one notebook (we started on April 1) and am well into my second (I ordered the others online).  There are so many stories to tell, I'm sure I'll have several of the books filled by the time this is all over.

When we started this project, we quickly found that there are a number of crafty celebs and others who are doing similar projects.  I've been following Layle Koncar and Heidi Swapp on Instagram and via blog.  They both have some great pages that are very inspiring.  And, most recently, Christen stumbled across The Isolation Journals created by Suleika Jaouad. This article is a great read and shares how the whole thing got started and why archiving these stories is important.

The point of all this is to share with you what we're doing, and I'm really excited about these journals. You can see most of what I've done so far on my Instagram and Facebook pages (linked here).  I'll leave you with a couple of pages below. Until next time, keep crafting!

Cindy Murray
Crafty Neighbor


Thursday, April 30, 2020

My Month in Quarantine (Part 2)

I just wanted to do a quick post to remind you about National Scrapbook Day coming up on May 2.  Many of you probably had plans to celebrate this little holiday by cropping or retreating with your friends. Most of those events have been cancelled due to COVID-19, but that doesn't mean you can't celebrate anyway -- even if you're not a scrapper!

I was supposed to be heading to a retreat on Thursday with several of my crafty friends, but the retreat decided to cancel their event. I'm so sad, especially since Scrapbook Expo in Irving was cancelled, and Great American Scrapbook Convention is now moved (very inconveniently) to the same weekend as my daughter's wedding (uhh...Christen, would it be okay if I duck out early to go crop? LOL Oh, you want to go, too?  Okay...). Seriously, though, I really wanted to crop with my friends, and I wanted to have that "retreat feeling", so we're going to make it happen, even if we have to all stay in our own homes.

I host a weekly crop at my house every Thursday, and when coronavirus decided to rear its ugly head, we decided to continue cropping via Zoom.  Zoom meetings is very easy to use, and I opted to pay for the premium service (for now) so we can have meetings longer than 40 minutes. We meet every Thursday at 10 AM and crop until 4PM or until everyone has to get offline to go make dinner. It's very much the same as having everyone here in person.  We work on whatever we're working on and we chat, and sometimes we get engrossed in our projects, so we don't talk at all, but we're still together.  And we get the satisfaction of being able to share our projects with each other. It's so much more fun than crafting alone.


A virtual crop with my Thursday MDO crop group.


For our National Scrapbook Day crop and retreat, we'll again be using Zoom, but we'll start on Friday morning and the crop will run continuously until Sunday afternoon, so everyone can come and go.  The idea is to treat it just like a real retreat, so I'm going to chase my family out of my craft area and put up a big sign that says, "Gone on a Retreat!" I'll even wear my pajamas and eat some junk food, just to make it feel real.  One of our friends is coordinating "door prizes" to be given away; everyone will dig through their stash to find a few items they no longer want or need. We'll take pictures to post in our Facebook group and we will have drawings throughout the event for people to pick which prizes they want.


You don't have to do something as elaborate as our little virtual retreat, but you should definitely consider doing something for National Scrapbook Day.  Some stores are posting that they are going to host events. Or you could join one of the many virtual crops already planned (just Google National Scrapbook Day Virtual Crop). Use Skype, Zoom, FaceTime or another video chat software to meet with friends.  Finding ways to be social, even when we're social-distancing, is important to our mental well-being. And besides, who can say "no" to an excuse to stay in your PJs and eat junk food?

Cindy Murray
Crafty Neighbor

Wednesday, April 29, 2020

My Month in Quarantine (Part 1)

Image created by articular - www.freepik.com
These are strange times, aren’t they? Two months ago, I could not have imagined that I would have spent the last six weeks confined to my home except for essential errands like groceries and the pharmacy. Two months ago, I was happily planning several craft weekends with my friends, getting my mom’s estate in order, and working on some big and exciting projects. Last month, everything changed.

If you’re like me, this crisis has meant a lot of changes in your home and work life, and you may find that you have a lot of extra time on your hands or that you’re busier than ever. As I’ve mentioned before, I’m a travel agent, and I typically work from home, but no one is traveling now. Most of my business has either cancelled or moved to later dates, and no one is looking to arrange new travel until this whole situation has settled down, and then who knows whether anyone can afford it since so many people are out of work. So basically, I’m out of work, too.

I had thought this bit of respite would allow me to catch up on a bunch of projects, and I could spend a lot of time crafting and reorganizing my studio. But all this free time I imagined I would have has completely evaporated into the ether of having 4 people living in the same house, cooking 3 meals a day, and generally keeping me busy and distracted.  So, when I mentioned last month that I had a project in the works that I was going to start sharing here on my blog, I really believed I was going to have time to do that, when in fact, this is the first chance I’ve even had to think about my blog. (sigh)

What was the big project I was going to share with you? My daughter’s wedding! Yes, I was very excited to share with you that my daughter got engaged last fall, and we are planning lots of crafty things to go with her rustic-chic theme. We wanted to do a lot of the work ourselves for a number of reasons. Obviously, we are both crafty people and have been hoping for the day when we could put our skills to work on a wedding, but doing the planning ourselves affords us more control over details, and in the long run, if we’re smart about it, a good bit of financial savings. For instance, pretty, laser-cut invitations generally start around $5 each, so for 100 guests, it would easily cost upwards of $500 for a simple card and envelope with inserts. Doing a card as elaborate as the one we designed (I’ll show it in a future post) would cost us over $1000. By making them ourselves, we may spend more time and effort on it, but will spend only $250 on paper and envelopes, and likely less than $350 once you add in printer ink and adhesives.

So with Christen’s wedding scheduled for August, we started planning our projects carefully and we scheduled work days on various weekends so that we could get it all done in time without having to rush. I was going to share those projects with you as we went along, but then the COVID lockdown came, and social distancing prevents us from getting together.  Fortunately, I did manage to get some pictures of the projects we completed before the shutdown, so I’ll share those with you, and hopefully we’ll be back to working on our projects together soon.

One of the trends we’ve seen on Instagram is a Remembrance Table featuring photos of deceased loved ones. We liked this idea because a lot of very dear people in our family have passed on, and we know they would be a part of this magical day if they could be. So in keeping with Christen’s shabby-chic theme, we opted to alter and distress the photo frames ourselves, which is very easy to do. We’re also going to use the frames for signs during the reception, so we estimated that we needed about 20. In order to keep this project inexpensive, but not cheap, we raided the stash at home before paying a visit to the Dollar Tree to see what they had. 


The frame in the center was treated with a torn paper decoupage.
The frame on the left was painted, distressed an then Christen added lace and pearls.

This was a Dollar Tree framed artwork, but we liked the frame,
so we added pearls.

This is one of several identical frames that were a reddish brown color.
Christen painted and distressed it before adding the burlap ribbon and flower.

You've probably seen these wooden frames in the dollar bin at Michael's.
Christen painted this one and then added some beautiful foil stickers.
 
I was really excited about the way this one turned out.
This was a clear acrylic frame that I recolored using alcohol inks.
The picture doesn't do it justice!

Another simple upcycle -- Christen added rhinestones to this
plastic gold frame we found at Dollar Tree. 

Another of the Michael's frames. Paint and embellishments by Christen.

There are two of these frames in two sizes.  Christen painted and distressed this one
before adding strips of bling.  The two rhinestones on the sides cover a metal
embellishment that didn't look good with the paint.


As you can see, we’ve used a lot of different techniques to dress up these frames. We’ve used acrylic paint, alcohol ink, lace, ribbon, pearls, rhinestones, metallic stickers, and even bits of old broken jewelry.  We had a few that didn’t get finished because we needed to spray paint, etc., but then the weather turned damp, so it will have to wait for warm sunny days. My only regret is that we failed to take any “before” pictures, so you could see what we’ve done. We'll post the remaining frames when they get finished.

So that’s it for this post, but I wanted to let you know about all the exciting project posts we have coming up.  In addition to the distressed picture frames, we’ll also be working on:

· 
  • Handmade pocket invitation suites
  • Floral arrangements and décor
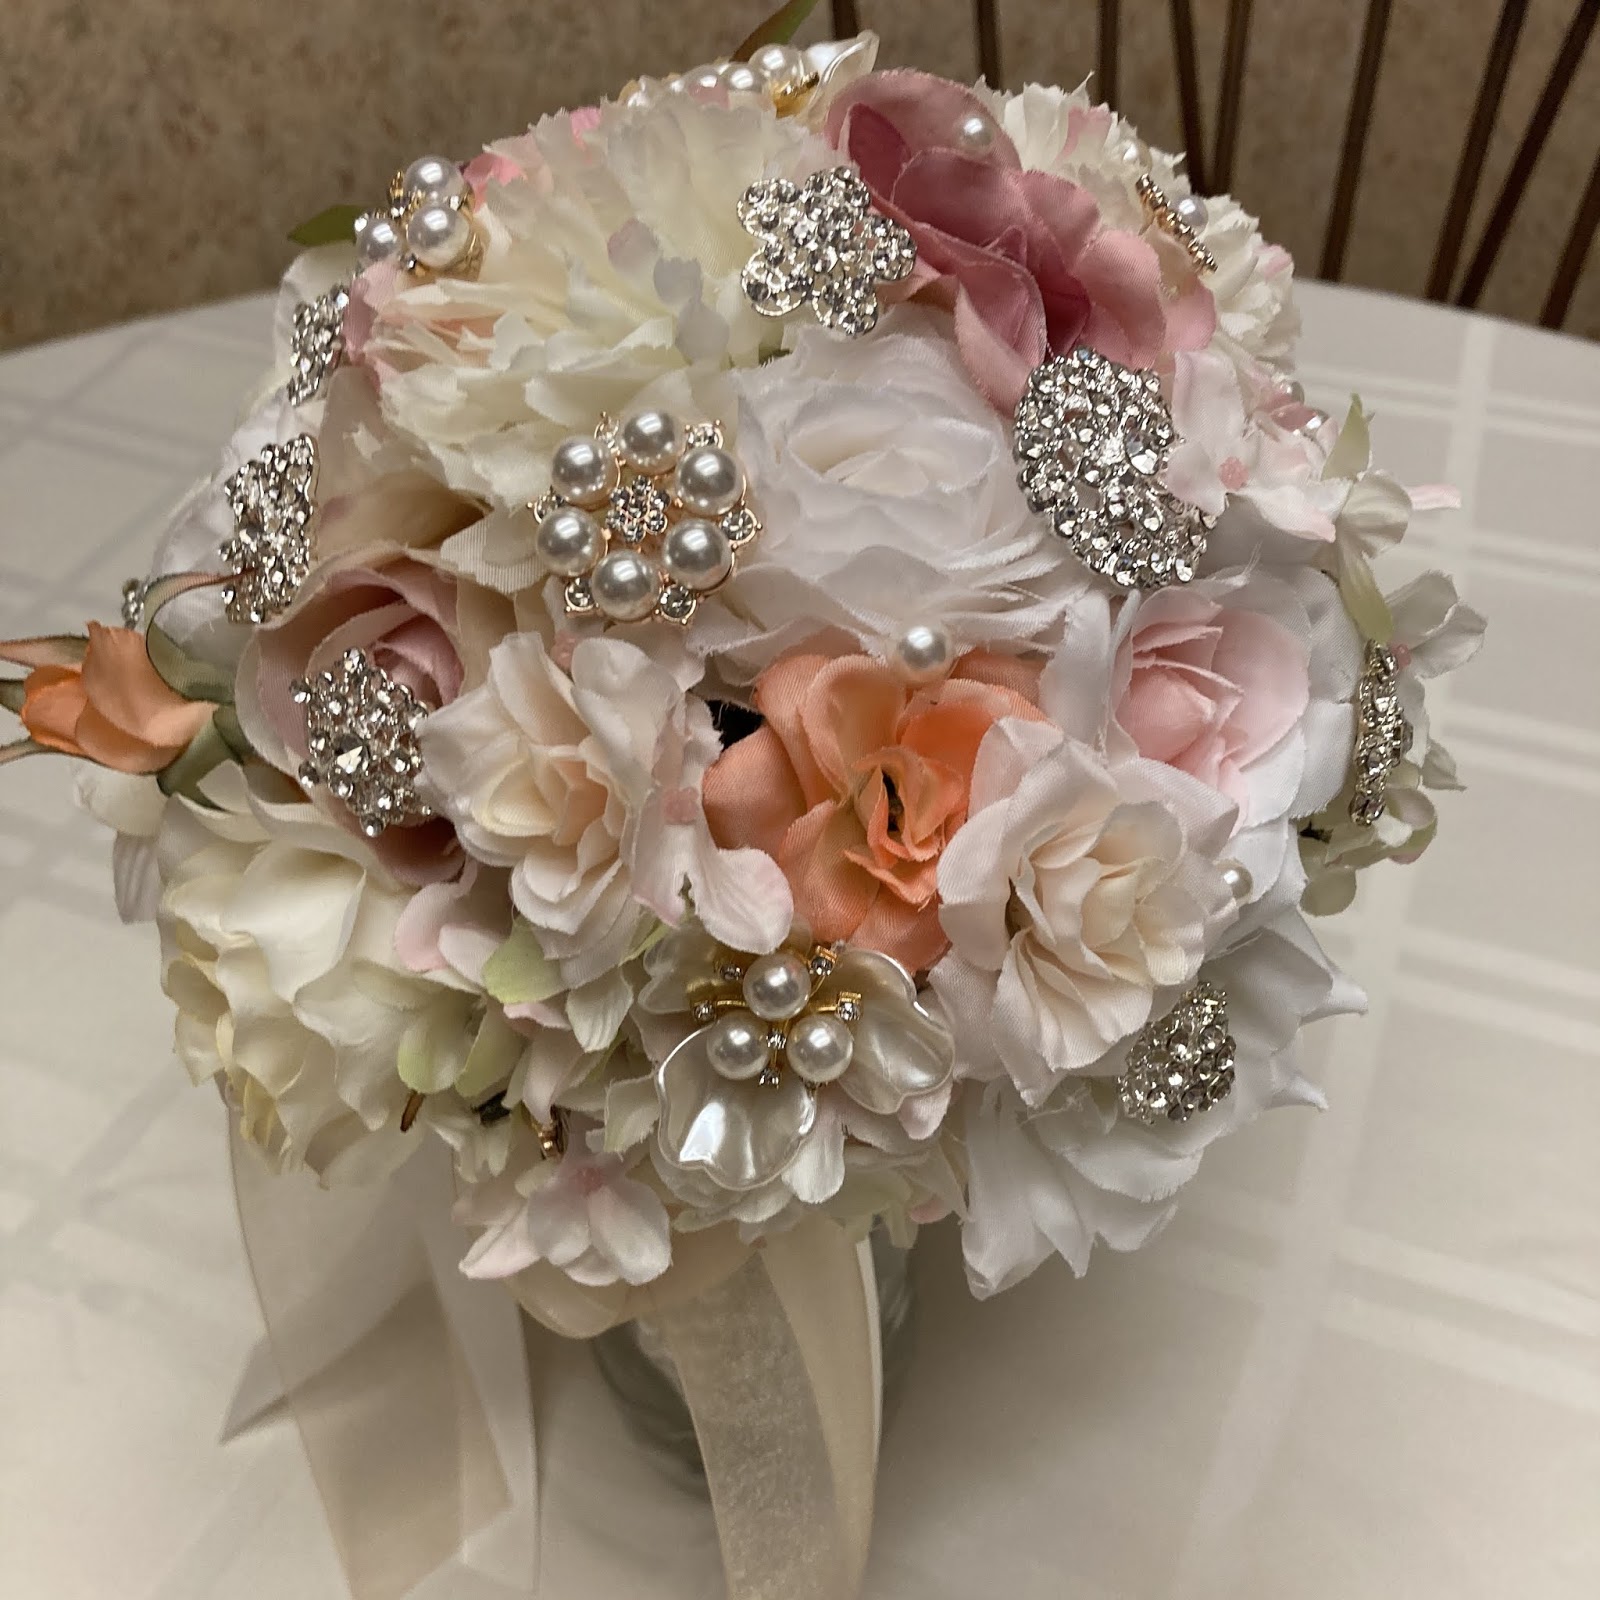
  • Bouquets and boutonnieres
  • Bride’s Maids gifts
  • Favors
  • Recycled chandelier
  • and so much more!

Those posts will be popping up over the next few months as we work on different projects.  In my next post, I want to share with you another project I’ve been working on during this coronavirus crisis, and keep your eyes out for a video flip through of my 2019 One Little Word project and a sneak peak at my 2020 album.

Thanks for stopping by, and I hope you’re finding some time to be crafty!

Cindy Murray
Crafty Neighbor

Wednesday, March 4, 2020

One Little Word


Hey there crafty friends! If you saw my blog post from yesterday, you know I've been dealing with a lot of personal issues (and more that I haven't even talked about yet!), but that hasn't stopped me from getting crafty whenever I can. For instance, right now I'm working on my 2020 Word of the Year, aka One Little Word project, and this year, my word is "Clarity".

If you haven't heard of One Little Word, it's been around for a long time, and has been used by various celebrities, life coaches, and online gurus for years.  It's part self-help with a crafty twist, and many adherents participate year after year. The most basic approach is to pick a word (usually something you want to focus on, learn, or manifest in your life), and you find ways to bring that word into your daily life.  My first Word of the Year was in 2013, and I started a "365" project (see below). Last year, my good friend, Susan, gifted me with a subscription to Ali Edwards' "One Little Word" online workshop, and I was hooked! This will be my second year to participate, and I can honestly say I've gotten more out of my word than with any other project.

So I finally managed to find the time to record a flip-through video and I can't wait to share it with you, even though 2019 is over and done.  It's such a wonderful and creative process that I can't resist.


The video isn't great (still working through the bugs in that process!), but I hope you got a good idea how cool the One Little Word project really is.  Maybe it will inspire you to do a OLW project of your own? Oh, and if you're new here and curious about my 365 project (no, I didn't finish it, but I do still work on it), you can start with these posts here:

You can also search "365 project" right here on my blog to see more info about many of the daily projects I posted in the Flikr group.  

Thanks for reading, and I can't wait to share more of my One Little Word and other Ali Edwards projects with you!

Cindy

Tuesday, March 3, 2020

Caregivers, Worker Bees, and Little Bits of Crafting

Have you ever wondered what it would be like to have to care for an aging parent? I did not. Well...I did, but then I quickly realized I am not cut out for the nurturing care-giver and put it entirely out of my head.  That was my sister's job.  I was a worker bee.  I owned my own business, I volunteered with charities that were important to me, and I stayed busy all the time. My sister, Patsy, was the nurturing type. She went to nursing school until her own medical issues put a stop to the, and she always swore she would be the one to take care of my parents when they got old. And she did.  She took care of my dad through recovery from a heart-attack, gall-bladder surgery, and over a year of hospice care. She took care of my mom through all that, too, and I was glad for it...especially since I live 300+ miles away.

Then the unthinkable happened...my sister died unexpectedly, leaving her handicapped, adult daughter and my mother, who was already beginning to show the signs of dementia. I moved my 29-year-old niece to live with me in the city so she could get a good education and learn to live on her own (public transportation should NEVER be underrated!), and eventually, we convinced my mother to move from her paid-off home in rural Texas into a senior living community where my brother and aunt could help take an eye on her. That didn't last long, though, as her needs were far greater than I had known, and she was already incapable of independent living.  Add to that the fact that she had squandered her retirement by pulling all of her investments during the stock market crashes of the early 2000's, and then she lost her job, losing her medical and life insurance benefits in the process.  All that to say that in January, Mom moved into my remaining guest bedroom, and now we have a household of four with some very distinct, and often time-consuming, needs.

Being a caregiver has put strains on my family and me that I could never have imagined, and it's made it even more important to me to get in my crafting time whenever I can. It hasn't been easy, but I've found that if I break things down into smaller tasks, and squeeze them in whenever I have an opportunity, it really gives me the outlet I need to calm my mind, let go of stress, and just zen out for a little while.  For example, today, I had to take my niece to the doctor.  I didn't want to go inside with all the sick people, and I could have sat in the car playing on my phone, but instead I took a portable project (embroidery) with me to work on while I waited outside.  I didn't get a lot done, but it was a lot more enjoyable and productive than sitting in that doctor's office with a bunch of sick people playing "Words with Friends" (nothing against WWF).

The start of some flowers on an apron.


So whether you're a caregiver, a worker bee, or just someone with a lot of hats to juggle, the truth is there will always be things that get in the way of crafting time. Whether it's a deadline a work, a sick kid, a second job, etc., you can't let it consume your life. Making the time to craft is not only possible, but necessary.  We all need those few precious moments of space where we can let go of the stress of the day and find something beautiful in our lives to experience and celebrate. It doesn't have to be a marathon weekend of crafting, or even an hour...just grab yourself five minutes when ever you can while you're watching the evening news, taking your 15-minute break at work, waiting for the roast to cook, or sitting at the doctors office or carpool line.  Just do it. Your body needs it, your brain needs it, and you'll be really glad you did!