Showing posts with label NASCAR. Show all posts

Saturday, June 16, 2012

Time for More LOAD 512!


Time marches on, and at this rate it might be March 2013 before I get all these layouts uploaded.  All kidding aside, here are some more layout samples from the May LOAD.

Day 17:  Cartoon Connection

Lain’s prompt for this day was Cartoon Connection.  As mother to a family of cartoon and anime lovers, I could certainly have gone any number of directions with this prompt, but in the spirit of keeping it simple and getting things done, I opted to work on one of Christen’s dance layouts.  This actually kills two birds with one stone – not only do I get to use up some of those old film photos that have been laying around here for years, but I also get to work on eliminating stuff in the file cabinet where I keep all the documents and memorabilia like dance recital programs.  This particular program was very large and didn’t match my page, so I attached a file tab to the top and it will slide behind the page when I put it in the book.

The page itself is a very simple one.  Since the theme of the recital was Disney, I went with the Disney Castle and used “Once Upon a Time” as my title.  The title is actually a die cut from the Cricut cartridge “Storybook”.  The journaling medallion was die cut using my Big Shot and Stampin’ Up!’s nesting dies after I printed onto the cardstock with my printer.  The castle came from the Cricut cartridge “Life is a Beach”.  The paper came from a Die Cuts with a View paper stack called, of course, “Once Upon a Time”.


Day 18:  Smell

This Five Senses Friday prompt had me stumped for a while.  There are lots of smells I could scrapbook, but I really didn’t have pictures or paper for any of them, and one of the main reasons I did LOAD was to knock down the piles of photos, paper, and embellishments that are cluttering up my workspace.  So after a lot of thought, I settled on the smell of burning rubber.  This is a really simple page with no elaborate embellishments or techniques.  I like it that way.  I know a lot of scrapbookers who scrapbooked all their albums chronologically and who now look back on their early work with disdain because the pages are plain and simple.  The more techniques we learn, the more likely we are to clutter up our pages with them.  Don’t get me wrong, as you can tell from some of my layouts, I like a lot of glitter and bling as much as anyone, but sometimes layouts need to be simple, and there is nothing wrong with that.  One of the reasons I love scrapbooking my albums out of order is because styles and techniques change.  I like a mixture in my books and I don’t want to flip through it years from now and dislike what I see.


Day 19:  Pete/Repeat

Pete and Repeat were in a boat.  Pete fell out.  Who was left?  Repeat.  Pete and Repeat were in a boat.  Pete fell out…. It’s a silly joke that kids love, and it was also our theme for Day 19.  On this day, Lain challenged us to use something from the previous layout again.  Some suggestions included: use a photo over again, use scrap paper to make embellishments, use the same title, design, or color scheme, or even scrap the same subject from a different angle.

Didn’t I just do a blog about that?  Oh yeah…it was this one from the February LOAD:


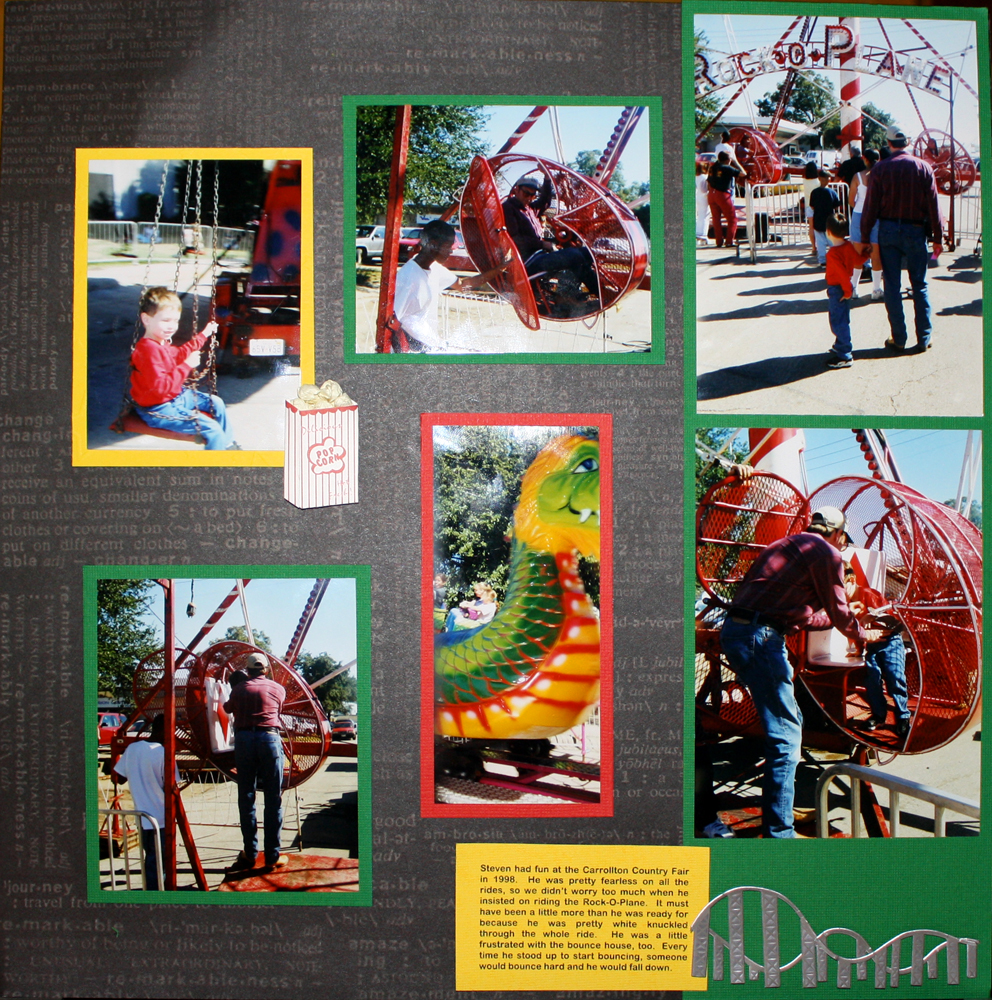
For this layout, I actually repeated several elements of my previous page. Not only did I repeat the strip of cardstock on the right hand side, but I also used a round embellishment as an accent on the title. The color scheme is also a variation of the muted pink, yellow and green that was used on the previous page. Even though the subject matter is not a repeat, they did both occur in the same year.


Tip of the day:

Do you own a Cricut?  Are you tired of thumbing through all the books looking for just the right embellishment?  Are you frustrated when you search for images on your Gypsy?  Do you wish there was a simpler way to find a specific die cut you are looking for?  Well there is!  MyCutSearch.com is a great search engine for locating Cricut designs. Here’s what the website has to say:

MyCutSearch.com will save you time when working on your scrapbooking, card making or paper crafts.  You will no longer have to flip through all of your Cricut handbooks or cheat sheets to find the perfect image to complete your crafting project.  Just type it into the search box and we will show you all of the choices you have.

Make sure to save the link to MyCutSearch.com on your computer.  Next to your scrapbooking paper, paper punches and tape runner, MyCutSearch.com could be your most important scrapbooking and card making tool.  When you think of scrapbooking and card making we hope you think of MyCutSearch.co

I used MyCutSearch.com to locate the castle I used on the Disney recital layout.  I love that I can search ALL cartridges, not just the ones I own.  Using the site has actually helped me decide to purchase a few cartridges I wasn’t sure I wanted.  A search turned up images that I thought I might use, and since Provocraft doesn’t put all the images on the outside box, I would never have known they were on the cartridge if I hadn’t used the search.  I also like that the website displays the images exactly as they appear on the font’s handbook – way better than the terrible drawings that pop up on my Gypsy.

Oh, one last thing….don’t forget to check our online calendar for upcoming events!  We have a lot of great scrapbooking opportunities coming up over the next couple of months.  You don’t want to miss it!


Sunday, December 26, 2010

Gift Giving for the Whole Year

I fully intended to have posted a couple of blogs in December with some great Christmas ideas, but the insanity level around here was at an all-time high and the blogs just never materialized.  I decided to not feel bad about it, after all, you’re probably too busy to read it anyway, and well, it just doesn’t really matter in the grand scope of things! 

This apparent lack of concern is a very new approach for me.  I’m actually the over-achieving, Type-A, obsessive-compulsive perfectionist of the family.  But I must say, the change in attitude has helped a lot with the stress I normally impose upon myself throughout the holidays.  I just have to keep reminding myself of the fortune cookie I got a couple of weeks ago.  It said something like, “Don’t worry about what you SHOULD do, concentrate on what you CAN.”  Great words of advice. 

So instead of worrying about the fact that half my gifts still haven’t made it to the post office or that I forgot to offer the eggnog and cider to our guests on Christmas Eve, I intend to sit back and drink that eggnog and cider myself while I watch my family play with the gifts that DID get finished.  Oh, and all those blog ideas?  Well, how ‘bout we turn them into projects and gifts you can make and use throughout the year?

For a quick and easy gift idea, try making one of these cute little gift tag sets:


These are some cute little gift tag boxes I made for teachers and a few friends.  I loved making these, they are such a simple concept and yet so versatile and VERY easy to personalize.  The original idea for these comes from the Splitcoaststampers website and were first presented to me by Stephanie G., a very talented Stampin’ Up demonstrator we know.  Later, Pam used this same concept as the basis for one of her classes on our fall cruise.  The tags can be put together in endless combinations, and I’m considering putting together some generic tag sets to use for birthdays, showers, and other gift-giving occasions.  If you want to see some more ideas along these lines, check out the Splitcoaststampers gallery.

Several of us belong to a Stampin’ Up! hostess club, and this month we learned how to make these lovely coasters/trivets.


We used Staz-on inks, Stampin’ Up! Craft Inks, Stampin’ Up Classic inks, stencils and stamps.  The tiles were baked at 350° for 10 minutes, cooled, and then sprayed with a sealant.  Felt pads on the bottom will protect your furniture.  I bundled up the four NOEL tiles in a pretty ribbon and presented them to my sister-in-law.  Monograms, names, special words, or even pretty designs can be used to personalize these for any occasion.

Speaking of monograms…


Last year, I made several monogram wall ornaments to give as gifts to my kids, nieces, and a few favorite teachers (see more in my December 2009 blog entry). 


This year, I had to make another one for my brand new nephew, Billy, and his two older brothers who live in another state, Todd and Ryan.  These are super cute and simple to make.  The cardboard letters are available at Hobby Lobby, or you can use wooden letters available at most larger craft stores.  Some 3-in-1 glue (it’s the BEST for sticking paper to chipboard!), patterned paper, and a little creativity can turn it into a very personal and lovely gift for people of any age.

Need something a little more elaborate or personalized?  What about a perpetual calendar?


I made this perpetual calendar for my mother for Christmas.  She’s a huge NASCAR fan, so I thought I’d do up her calendar in that theme.  It was a really fun challenge, and I’m really pleased with the results!  I’ve also seen University of Texas themed calendars, color-themed calendars, and really, just anything you can imagine!  If you’d like to give one of these a try, I teach it as a class (usually no more than 2 or 3 people at a time) and I provide all of your general supplies.  It’s a great deal, and you can create something completely unique!  For more information please see our website.

Okay, so you’ve made Aunt Sallee a really cute set of coasters for her sunroom.  You wouldn’t just throw it in any old box or bag would you?  This idea came from another awesome Stampin’ Up! Demonstrator (Sharon A.), what about making a super cute gift bag from an ordinary lunch sack?


Or what about making a beautiful tag?


I started making tags several years ago after another scrapbooker told me that she always makes a card with the scraps from every scrapbook layout.  She pointed out that your “theme” is already set, so are your colors…all you have to do is assemble it!  After she told me that, I started making LOTS of cards with my layout scraps.  But sometimes, there’s only so many red, white and blue cards that I need, so I decided to make tags, too.  Now, whenever I finish a page, I make a quick card and a tag.  All of these tags were made with my Cricut using a 5-inch "Tag1" shape on the Plantin Schoolbook font and various other cuts from other fonts.  The fun challenge with tags is that I sometimes try to make Christmas tags using non-traditional colors – like a pink and black snowflake card.  Some of them have turned out quite good, I think. 

So that’s it for my gift-giving, post-Christmas blog.  I hope your holiday season has been filled with all the good things in life:  friends, family, faith, food, and fun! 

Merry Christmas!
The Crafty Neighbor