Showing posts with label cards. Show all posts

Tuesday, October 6, 2020

Wedding Invitations


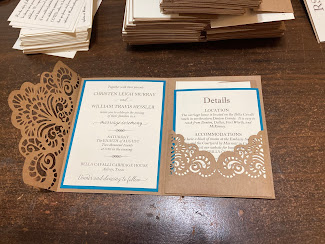
I know I promised this a long, long time ago, and I thank you much for waiting so patiently while we got through a whole bunch of stuff. It was just too much for Christen and I to do all this work on the wedding AND find time to blog about it. I did make sure to take lots of pictures, so I hope you’ll think it was worth the wait as I start on this series of wedding posts. So without further adieu, I would like to share the invitations we made.
 

Christen and Travis chose to wait about a year before getting married so they could have time to save up for the big day and to give us plenty of time to make all the crafty things we wanted. They found the perfect venue soon after, and we kept getting asked whether they had set the date, so we decided to send out “Save the Date” cards.

I designed these myself in Photoshop, using several fonts I downloaded from the internet. These included Lightfoot ShadowedSafina FancyJazz LETPlaybillDakota, and Little Lord Fontleroy. I also used Helvetica font, which usually comes installed on most computers.

For printing, I sent my postcard to Got Print, my go-to printing company. They offer fast, convenient service, highly competitive pricing, and they even have a facility right here in North Texas. Before sending your designs for printing, you’ll want to make sure you have designed the front and back as two separate files. You may need to convert to CMYK color, so be sure to read the instructions carefully for the optimal file format and observe the bleed marks, etc. We chose full color on both sides 4”x6” standard postcard on 14 pt. Uncoated Cover paper. Choose the online Instant Processing Proof to speed up the service and keep the costs down. We paid $31.88 for 100 postcards, including tax and shipping. Larger orders offer greater savings.

We had a lot of ideas about the actual invitations, but after months of playing with a Silhouette cut file that wouldn’t cut all the way (just too intricate at that size), we gave up and ordered this die set from Amazon*. We made about 130 invitations in all, and it took us a lot longer to cut out than we had estimated. For one thing, this tiny intricate die didn’t always cut well. We wound up having to use a shim and we had to stop frequently to cut wax paper with it a few times to help it release the little bits and pieces. There are so many tiny pieces in this design that it literally shredded my Sizzix Die Brush Tool*. After that, we tried a soft-bristled toothbrush before we settled on a stiff brush from my Sonic Scrubber*. The combination of the stiff bristled brush and the above-mentioned wax paper worked well, if a bit slow.


The die we used comes in two pieces, as shown. One cuts the pocket and the other is an edge die, which has a score mark to be placed against the fold-line of your trifold invitation. This particular die was designed to create a 4" x 6" card -- NOT the standard A2 (4 ¼" x 5 ½") card most commonly used in the U.S. We searched all over for a die to make the right size, to no avail. So we decided to make do with this one. The problem we found with this was that it was very difficult to get the score marks exactly perpendicular to the length of the card and exactly where it needed to be scored since we couldn't line up the edges of the die perfectly. Rather than try to precisely place the die on the fold, we chose cut the paper into 5 ½” x 12” strips and used the die on one end. Once it was cut, we could score at the edge of the die-cut area and fold it inward before trimming to the desired length…in this case, a standard 4 ¼” x 5 ½” card. So basically cut first, score, then trim.


The pocket die also contains score lines to help with construction. Simply fold the tabs inward and add adhesive before sticking it to the right-hand flap of your card. I used ¼” Scor-Tape* for a sturdy hold. 


The remaining parts inside the card were printed on my laser printer using Stampin’ Up Very Vanilla paper and a brown-toned ink using the following fonts: Imprint MT ShadowBell MT, and Octavina Swash. The Octavian font came as a bundle I purchases a while back from FontBundles.net, however it is also available for free on various font websites. The paid version offers contextual and stylistic alternates for many of the letters. We also added a text embellishment from the Type Embellishments One LET font. Embellishments like these are fun to play around with, and sometimes you can create lovely embellishments by combining two or more into a single arrangement. 


Inside the card, we included the formal invitation (on the left) and a Details card and the RSVP card in the pocket on the right. Right before we sent the invitations, we decided to also add a COVID statement/request as another item in the pocket to remind our guests to wear masks. 

The invitation was held together with a 1” belly band, trimmed to size. The “buckle” on the band was created with Mirri Lava metallic rose gold paper from The Paper Cut and the Artisan Label punch from Stampin’ Up. The punch is discontinued, but there are many fine dies and punches that would work just as well. The inner part of the buckle was printed on Stampin’ Up Very Vanilla on my laser printer using the Little Lord Fontleroy font again. I simply built the design using multiple layers of boxes and text boxes, moving each layer around until I had it where I wanted it. It’s hard to tell from the photo, but it was actually printed in black and then Travis (my new son-in-law!) ran it through my Heidi Swapp Mini Minc* to foil it in Teal*.


The other products we used to create the invitations were:

Bazzill paper in the color Blue Oasis, which I ordered from my good friend and former Crafty Neighbor instructor, Karrie Allen at Scrapp’n Savvy in Conroe, Texas.


Kraft Cardstock Paper from Hobby Lobby* 


One more little thing...because of the weight and thickness of the complete invitation, we had to add more postage when we took them to the post office.  My advice...put them all together and take one to the post office to be weighed before you put any postage on them...there might be a single stamp in the right denomination!


I hope you’ve enjoyed this little tutorial on making these lovely and lacy wedding invitations!  I’ll be posting more of our wedding crafts and other tips and projects soon. Don’t forget to like and subscribe to this blog so you don’t miss out!

*Here are links to many of the products I used. As an Amazon Affiliate, I earn from qualifying purchases.

&nbsp &nbsp &nbsp &nbsp &nbsp &nbsp


Thursday, February 14, 2019

Last Minute Cards Made Easy!

Hey, do you procrastinate making those handmade Valentine’s Day cards? Or are you like me, and you’re so busy, you just haven’t had time until now?  I have a bad habit of not making my cards until the day arrives, and I know there are others like me, so I wanted to send out a quick post to share a couple of ideas.  You could make these cards this afternoon, and no one would be the wiser!


I used products I had on hand for both of these fun cards, so it’s a great way to use up a few scraps! All you need is a pretty embossing folder (or two if you want them to be different), a background stamp, two different sized heart punches, a heart die (or use the large punch on both cards), some bakers twine, a bit of ribbon, your sentiments, an assortment of cardstock, and ink.  Oh, and don’t forget pop dots or dimensional foam adhesive to add interest.


I used mostly Stampin’ Up products for this, because that’s what I had on hand, including the papers, both punches, and ink.  I can't remember where the larger heart die came from.  The embossing folder was an old Stampin' Up folder called Elegant Bouquet. The background stamp was Gorgeous Grunge, which retired a few years back.  “Love” was from Close to My Heart’s #C1480 from the Roxieworkshop. “I HEART YOU” is from the Stampin’ Up And Many More set.

So what are you waiting for? Go make those cards!

Thursday, August 24, 2017

Think Pink Crop for a Cure Post-Crop


Hey there Crafty Neighbors!  I think I'm finally recovered from our Think Pink crop this weekend.  We had such a great time and we raised a lot of money to help in the fight against breast cancer.  You can see more pictures from the event on our Facebook page.  Now we're busy getting ready to head down to Houston for the Creating Keepsakes Convention there.  I'm really looking forward to networking with a new bunch of crafters from that area and making some cute projects at the crops.  It's going to be so much fun -- if the hurricane doesn't drown us! Looks like Harvey is set to make landfall in Corpus Christi, but we'll still be getting lots of rain in The Woodlands.  So say a little prayer that we stay high and dry!


One of the reasons we are heading to Houston is to promote our Crafty Neighbor cruises.  Sadly, we've had to cancel the September cruise for lack of interest, but we are still working on our February Brush Strokes in the Bahamas painting cruise (think "paint and wine parties"!) and our May Scrapbooking cruise to Jamaica and Grand Cayman.  Both of these are 7-night cruises and they are going to be so much fun!  We'd love to have you join us!  Just send us an email.

So now that I've gotten all that out of the way, how about some cut projects?  I have two for you today, to make up for my absenteeism of the last few months (did I mention I had a few surgeries?).

This first one is a card we made in our 3rd Wednesday Stamp Club meeting.  Denise is our Stampin' Up! demonstrator and she always has the cutest projects!  This one uses the new In Colors and the Eastern Beauty stamp set.  I just love the Lemon-Lime Twist, and I'm so happy they finally have my favorite color!

This second project is a page I did in my Bible after watching the video from Tracey Pounds of The Little Blue House.  You can watch the video here.  After she made the video, Tracey hosted a napkin swap, and this was one of the napkin I received.  In case you wonder about the verse or the prayer on the left page, my sister has been very ill since late June after she had open-heart surgery to repair her mitral heart valve, which was damaged by Rheumatic Fever when she was a child.  


That's it for today.  I'm working on some fun videos to show you very soon!  Until then, keep crafting!


Tuesday, April 19, 2016

We Pause for a Brief Commercial Message

Today I am in Promotion Mode.  That’s what happens when I have a lot of events and they aren’t filling up as fast as I want them to, or I just haven’t had time to take care of promoting them like I should.  Usually, I try to spread it out.  I don’t want my customers or my readers to be bombarded by emails and ads for things I’m trying to sell.  Some companies do that.  They’ll send out one or two emails every single day to remind you that it’s their annual “stock up on bath soap” sale, or “get extra points when you buy breakfast”.  It’s annoying.  I don't want to do that. 

Instead, I prefer word of mouth.  I want my customers and event participants to have so much fun at my events that they are eager to share with others and ready to come back and play again.  Don’t get me wrong, I do have to occasionally drop subtle hints, or post an occasional reminder on Facebook, and I send out roughly one newsletter email a month to let everyone know what’s going on, but lately, I have been so busy that I haven’t done any of that (or at least not much).  So I thought today I would do something I almost never do, and that is put it all in a blog post.  After all, I really don’t share all this stuff on the blog very often because the blog is more about crafting and projects, so you might not even know what’s going on.

Of course, a blog post with nothing but me hawking my wares would not be any fun at all, so today I’m going to kill two birds with one stone; I’m going to share some projects with you, and tell you how they relate to some of my events!

First, lets start with 

Cards (and other things, too!):


These cards were some that we made recently at our 3rd Wednesday Stamp Club meetings.  If you aren’t familiar with it, the stamp club is a gathering we have here at my house (aka Crafty Neighbor Studios) once per month.  We are led by Barbara King, a Stampin’ Up! demonstrator who prepares 2-3 projects for us to do each month.  It’s a lot of fun, and we’re definitely learning a lot of great techniques!  So if you’re in the DFW area on a 3rd Wednesday, please feel free to join us!  The first visit is free, after that, there is a $30 minimum order.  You can find all the details on Meetup.com.

Classes:


An example of our Perpetual Calendar

Recently, I’ve had a lot of requests for classes, including repeats of several classes I taught in years past.  My trusty side-kick and helper extraordinaire, Marion, and I worked up a schedule we thought would work for anyone, but I guess we were scheduling things too close to the end of school or something because we are still getting emails asking for different dates and times.  So here’s the deal…if you are in the DFW area and you want to take any of our classes, go to our Facebook page and find the post I made today about classes.  Give us your input about dates, times, etc.  We’ll use that info to come up with some more class dates – I promise!

Crops and Retreats:


I don’t have any public crops or retreats coming up any time soon.  I usually like to have one or two fundraiser crops per year, but I am not walking in the Susan G. Komen 3-Day this year, so no crop for that.  If you have an organization that needs to raise money, and you would like to host a Scrapbooking Fundraiser Crop, give me a shout!  I will be more than happy to organize one for you!  This is especially true in the DFW/North Texas area, but I will also help with crops in other locations as well.  It’s a great way to raise funds for your organization, and it works particularly well for schools, churches, and non-profits like breast cancer charities or social services organizations.  If you are interested, please send me an email.

Cruises:


I haven’t promoted them much here, but one of my favorite projects every year is our annual scrapbooking cruise!  The exciting thing about this year’s cruise is that we have two!  The full scoop is on our website, but here’s the skinny:

Crafty Neighbor Scrapbook LITE
Departing from Galveston, Texas
Carnival Liberty
October 3-8, 2016
Porting in Progreso and Cozumel, Mexico sailing 5 nights with “LITE” amenities, flexible crop times, and a more relaxed/fun environment.  Make your own schedule and work on your own projects.  Optional classes are extra.  Crafters and non-crafters of all skill levels are equally welcome.

Crafty Neighbor Scrapbooking Cruise
Departing from Galveston, Texas
Royal Caribbean Liberty of the Seas
January 8-15. 2017
Porting in Roatan (Honduras), Belize City (Belize) and Cozumel (Mexico) sailing 7-nights with FULL amenities, 24-hour open crop room, and lots of crafts, projects and demonstrations.  Participate in scheduled classes or work on your own projects.  All classes are included in the cost.  Crafters and non-crafters of all skill levels are equally welcome.

Here is one of the projects from our last cruise:

This simple layout was a make-n-take on our 2015 Scrap Cruise.
In all we had 4 make-n-takes, 1 interactive demo, 10+ hours of dedicated
class time plus games, contests, prizes, goodies and giveaways.

Garage Sales:


Last but not least, I’m sad to say I am still waiting for open dates at our Girl Scout facility for the semi-annual scrapbook garage sale.  They assure me that they will know the open dates by the end of May.  Keep your fingers crossed for a fall date.  If not, we may have to look at another facility, which would mean an increase in vendor rates, which I don’t want to do.

That’s it for now, thanks for your patience, and I hope you enjoyed the projects I shared as part of this giant advertisement! 

Thursday, November 19, 2015

Celebrate Life!

The theme for our 2015 cruise was Celebrate Life!, and our cruise instructors designed many fabulous projects to express that theme.  Here’s is a picture of the door decorations we made for all the participants. 

The decorations help make it very easy to find your room on these huge cruise ships!

One of our first classes on the cruise was a Basic Copic markers class taught by Debby Worthington.  Debby shared some basic insights on working with Copic markers and then everyone completed these cute cards and a 2-page layout using the techniques we learned:


If you'd like to know more about Debby, you can read all about her on our Instructor page of the Cruise FAQs website

Friday, March 20, 2015

Embossing Challenge

A couple of weeks ago, I was attending the Dallas Crafters Marathon weekend and participated in their monthly card challenge.  The theme was "Embossing", and we could use any kind of embossing we liked.  I was very happy that I won, and very surprised, too, because there were some very cute cards.


My card features the D'vine Swirls embossing folder from Cuttlebug.  I just love how the Pistachio Pudding cardstock looks with the Baked Brown Sugar cardstock and ink from Stampin' Up.  The stamps I used were also Stampin Up: Bliss, Gorgeous Grunge, Best Friends Forever, and Perfect Pennants.

I love competing in challenges.  It forces me to think outside my normal creative patterns and put my skills to the test.  By stretching my creative muscle, I become a better, faster, stronger crafter.

Tuesday, March 17, 2015

Crafting in Paradise


Looking outside today, it's hard to believe that just a week or so ago it was snowy and cold here in the Dallas area.  Having just come back from a cruise with the Denton County Aggie Moms, I was not happy to be stuck indoors wearing layer upon layer of clothes to keep warm.  Now it is warm, and I want to be outside, soaking up some sun!  So for all of you who are still deep in the throes of winter, who are aching for some sun and tired of all the snow, here's a little something to help take your mind off needing another layer of socks....


Picture this, a warm Caribbean breeze is gently blowing through your hair, the warm sun kisses your skin while the tide licks your toes and keeps you cool.  A fruity drink with a pretty little umbrella is in your right hand, and your left hand just found your favorite song on your iPod.  

Hours later, after a delicious meal, you head to the Conference Center, where you and your friends can while away the hours working on your scrapbooks, cards, or other crafty projects.  Everyone is having a great time, learning new skills, creating beautiful things, and enjoying each other's company.

You get to do this for SEVEN DAYS.  No dishes, no laundry, no work...just you, your crafts, your friends, some fun workshops, and a cruise ship full of more fun and activities that you could ever imagine -- and it's all included in one very low price! 

Sounds like heaven, right?  Well it can all be yours for the very low starting rate of just $741, which includes 7 nights accommodations, meals, workshops, 24-hour access to our crop room, plus lots of goodies, gifts, prizes, and more.  Payment plans are available, and your deposit of $250 will hold your spot. 

But hurry!  These rates are only available through May 29, 2015, and once our allotment of cabins is filled, new bookings will be at the current market rate.


Today's card is a fun one I made a while back when I hosted a "Cruise Week" open house.  I listed the supplies used below.  This was a really simple card, and I had a lot of fun making it.  It features several layers, with the stamp and "You're Invited" popped up over the embossed piece.  Here is a picture of the card face before I embossed the background and added the stamp and sentiment:


It looks a little plain without the embossing, don't you think?

Supplies:  Stampin' Up Very Vanilla card stock, "Oh, Hello" stamp set, "Square Lattice" embossing folder, Baked Brown Sugar, Costal Cabana, Crisp Cantaloupe, Pistachio Pudding and Strawberry Slush inks.  Close to My Heart "Post Card - Travel Series" stamp set.
 

Monday, December 15, 2014

A Good Deal on Dies...

This past weekend, I was at a retreat at Scrappin' Goodtime in Corsicana.  While we were there, Jen Long, in-house designer for Sizzix, was there demonstrating some of Sizzix's new dies.  We made two cards, and I loved the dies so much I had to buy two sets.*


Both of the sets I purchased have 20+ dies in them and sell for $19.99 each.  That makes them an incredible value at less than $1 per die.  I was also fortunate to get a retreater's discount  for an even greater savings, and I've already used the new dies several times.

The dies used on these cards were:


*I purchased these two sets, and will be sharing more projects that feature them later on this week.