Tuesday, October 8, 2019

December Daily Product Reveal

Howdy!

I know it's been a long time since I posted.  Life sometimes has a way of getting complicated, and mine has been just that.  I'm long past hoping for it to untangle and be less complicated, and am now just concentrating on making the most of it. So since my last post, I've continued to help and support my niece who has lived with us since my sister passed away.  She's in college now, and since she doesn't drive, I'm the wheels that get her where she's going if the bus can't get her there.  I'm trying to keep tabs on my mother, who lives all alone in West Texas (over 300 miles away) and is having some memory issues.  My dog has had eye surgery, a stomach bug, and a crick in her neck (I couldn't make this stuff up if I tried). I've also been busy with work (I'm a travel agent by day, and a craft event organizer by night), AND my daughter decided to get engaged, so we're doing lots of wedding planning! There was also a lot of other crazy things going on, but we'll leave it at that.

So...my last post was a quick flip through of my One Little Word album for January, and I posted a couple of Layout-A-Day posts for LOAD 219.  Since then, there have been two more LOAD events, and I'm currently working on the third! I did make another flip through video of my OLW album back in June, but then I never edited it, so I might as well start over. I am keeping up with it, though, and I'm a couple of days behind on LOAD 1019, but I'm hoping to catch back up tonight.  The pages are planned; all I have to do is implement them. Hopefully I can post some of those soon.

For today, though, I wanted to share with you a box reveal.  I received my December Daily order this afternoon, and I wanted to show you what was in the box.  I'm excited to start working with these products and I can't wait to get my December Daily album going.  I actually purchased an extra kit for my daughter, Christen, and her soon-to-be step-daughter.  They both have birthdays in November, so I thought this was a perfect time to get them hooked on Ali Edwards products, too!

Anyhoo, here's the video.  I hope you enjoy, and I hope to be back soon with some of my layouts for LOAD 1019.

Sunday, February 17, 2019

One Little Word January Flip Through

Howdy there!

If you've been following me this week, you may recall my mention of One Little Word, a digital online class presented by Ali Edwards.  My sweet friend, Susan, bought the class for me as a belated birthday gift.  I've been talking about it for years, and although I've had a word of the year for many years, I've never taken any of Ali's classes.

For those of you who don't know, One Little Word is a year-long class that focuses on finding a word that represents your goals or intentions for the upcoming year. If you want to know more about finding your own word of the year, just put that in the search terms on this blog page.  I've talked about it many times!  This will be the first time taking Ali's class, so I'm not sure what's really in store other than the fact that each month she will present a lesson with prompts (homework).  I've gotten a bit of a late start since I only recently started the class, but I'm enjoying the work.

So even though I got started a bit late, I think I'm going to be caught up soon, and I wanted to start sharing, in part because it's good for me to share, and also to break up the monotony of so many 12x12 layouts from all of my Layout A Day posts.  So here's a peak at my album so far, and I will continue to post more videos and pictures as I move through the class.


Thanks for watching! This has been a fun process so far, and I look forward to sharing more with you.  In the mean time, I'd love to hear about your word of the year (or one little word, if you prefer). Tell me about it in the comments below!

Saturday, February 16, 2019

LOAD Day 4 - Twist and Shout (Out)

Welcome back for another day of LOAD 2019!  Today, I am sharing my page for Day 4, using the prompt based on the twister in the “Wizard of Oz”.  The prompt was to tell a story with a twist, but I chose to focus on the twister itself, and tell a tale from my childhood about living through a tornado.

One of the things I love about doing LOAD is that it reminds me of all the stories I need to tell.  I think we often get so focused on the PHOTOS of our lives, that we forget all about the stories and events that DON’T always have photos.  And we are so busy creating pages and albums of our children, our trips, and our holidays, that we don’t always tell the stories of our own childhood or share the bits and pieces of our life that share who we are and where we came from. For me, that is the whole purpose of scrapbooking…to tell those stories so they aren’t forgotten…to share them with future generations who will want to know who we are and how we lived.  


I didn’t have any pictures of my own from this event, but a quick search of the internet turned up dozens of photos I could easily download from various archives.  I printed them at a smaller scale so I could fit more to one page, as I didn’t really think this warranted a 2-page layout.  I also found a photo of the next day’s front page of the local newspaper, so I printed that (reduced, of course) onto parchment and inked it for additional aging.

The background paper came from Basic Grey, sorry I can’t remember which line. I was looking for something distressed looking.  It probably didn’t matter since it’s mostly covered up anyway. I wanted to really add to the sense of chaos and destruction, so I skewed all the elements on the page, and even ripped and inked the edges of the journaling that I printed on parchment paper.  I didn’t think it needed a title in the true sense of the word, since the headline on the paper says it all, but I did add a date near the top, using a rolling stamp. I think the stamp’s messy imprint adds to the disarray of the page.

A word about the parchment paper….  If you follow my Facebook page, Instagram, or this blog, you may have noticed that I’ve used the same parchment paper several times lately.  If I were scrapbooking chronologically, as many people do, I certainly would not have done that because then all my pages would start to look the same.  That’s one of the things I love about scrapbooking in no particular order – I work on the pages as the inspiration comes to me, perhaps telling a story from my childhood one day, and creating a page about my son’s high school orchestra the next.  Since the pages are never side-by-side in the same book, you would never know that I went through an “eyelet stage” or an “embossing stage”, or even a “parchment paper stage”.  So as new products come out, I feel free to use them on any of my projects, and my albums are never “dated” by a certain style or technique.


I also want to give a shout out to everyone who will be at Scrapbook Expo next weekend.  I will be in the crop room most of the time, so if you are there, or if you see me on the floor, come over and say "Hi," and mention the blog. I love hearing from you! Even better, ask for a selfie and post it on your Facebook, Twitter, or Instagram page.  You can tag me, Crafty Neighbor, or both!  Your tag will enter you in a drawing for a cool prize pack, and everyone will get a little gift for tagging me!

Next up – our prompt is about being in an unfamiliar environment, and we can use a technique we’ve never tried, or one we don’t use very often.  I’m thinking I might do something digital!  If I do, I may make a process video.  This should be fun!

Keep crafting!

Friday, February 15, 2019

LOAD Day 3 - You Big Ol' Softy


For LOAD Day 3, my prompt was to make a page about a “Softy” in my life, or use something soft on my page. I chose to do both!  My Dad was a real softy, so I used this page to tell how the strict disciplinarian turned into a bit of a marshmallow when his grandkids came along.  

To make this page, I used papers from DCWV “Main Street” collection and a few odd bits of cardstock scraps from my stash. The photo mat is actually flocked paper from the DCWV collection, and that’s where I pulled in the “soft” item on my page. I also softened the edges of some elements with distress ink. 


I wanted a masculine-looking font for this layout, but one that wasn’t too harsh, so I used “Habitat” from a collection I downloaded at FontBundles.net.  They have a lot of great fonts that are free to download.  I used that for the photo caption tabs.  I also used Creating Keepsakes “CK Man’s Print” which was released years ago on a font CD, but which you can now download for free at FontsMarket.com.  The title “Daddy • Dad • Poppy” was made with some stickers from my stash.  They were the wrong color of teal for this layout, but I colored over them with a W7 Warm Grey Copic Marker.  


I use my Copic markers to change the colors of my scrapbooking supplies all the time…in fact, it was the primary reason I first started buying them.  I used several markers to get just the right color on my embellishments on this page.  The blue-ish chipboard heart was originally a sky blue.  First I colored it with Brown E25, but the surface of the chipboard was slick and it didn’t cover evenly, so I sanded that lightly, leaving it very distressed.  Then I colored it with BG72, G24, and BG13 in that order until I got just the right shade I was looking for.


The remaining embellishments were some hearts from a Basic Grey “Sugar Rush” sticker sheet (I colored one of the hearts with the E25 and BG13 to cover some colors that didn’t match), phrases from Tim Holtz and Heidi Swapp, plus a chipboard heart and a glitter heart that came from my stash.

Thanks for stopping by today!  Come back tomorrow for my layout with a “twist”!

Thursday, February 14, 2019

Last Minute Cards Made Easy!

Hey, do you procrastinate making those handmade Valentine’s Day cards? Or are you like me, and you’re so busy, you just haven’t had time until now?  I have a bad habit of not making my cards until the day arrives, and I know there are others like me, so I wanted to send out a quick post to share a couple of ideas.  You could make these cards this afternoon, and no one would be the wiser!


I used products I had on hand for both of these fun cards, so it’s a great way to use up a few scraps! All you need is a pretty embossing folder (or two if you want them to be different), a background stamp, two different sized heart punches, a heart die (or use the large punch on both cards), some bakers twine, a bit of ribbon, your sentiments, an assortment of cardstock, and ink.  Oh, and don’t forget pop dots or dimensional foam adhesive to add interest.


I used mostly Stampin’ Up products for this, because that’s what I had on hand, including the papers, both punches, and ink.  I can't remember where the larger heart die came from.  The embossing folder was an old Stampin' Up folder called Elegant Bouquet. The background stamp was Gorgeous Grunge, which retired a few years back.  “Love” was from Close to My Heart’s #C1480 from the Roxieworkshop. “I HEART YOU” is from the Stampin’ Up And Many More set.

So what are you waiting for? Go make those cards!

Wednesday, February 13, 2019

Layout A Day - LOAD 219

Yesterday, I mentioned Layout-A-Day, but I didn’t really go into what it was.  If you’ve followed me for a while, you’ll know that LOAD (as it’s affectionately called) is a month-long challenge I’ve taken on many times over the past few years.  My first LOAD was in February of 2012, and I joined in after I saw a post from another blogger I follow (Joy Tracey’s Obsessed with Scrapbooking), and I was intrigued.  I wanted to be more productive with my scrapbooking, and this gave me the perfect excuse to do a little crafting every evening after dinner (“You need someone to take you to the store to get supplies for your science project? Go ask your Dad, I have to do this layout for Layout-a-Day’). So I signed up, and have been hooked ever since.

My stack of layouts after I completed my first LOAD in 2012.


The brainchild of Lain Ehman, LOAD typically ran 3 times per year, in February and May, which were open to the public, and in October, which was open only to the members of Scrap Happy, an online network of Lain’s followers.  I wasn’t much interested in the Scrap Happy group, so even though I was sad I couldn’t do the October LOADs, I never joined.  Instead, I just did every February and May, completing every daily challenge on time…that is, until my Dad had a heart attack.  Then I had to drop everything to go home, and it just fell apart after that.  I never finished that February challenge, May got interrupted by something else, and eventually, Lain decided she didn’t want to LOAD any more.  I had heard that someone else bought the rights, but I wasn’t on the mailing list, never found out who it was, and so I was just sad that such a fun and interesting challenge had fallen by the wayside.

Fast forward to January, 2018, and once again, I found myself signing up for LOAD!  I can’t remember how I found it, but somehow I stumbled across a link to the next event, which was starting up the next day, and my heart took a giant leap!  I was so excited to join again, and I did.  But there was a hitch…I was set to leave on a cruise in 4 days, and I would be nearly a week without internet and with very little scrapbooking supplies. Regardless, I was determined to do it anyway, so I packed up a little tote of supplies, a traveler’s journal, my trusty HP Sprocket printer, and I decided to scrapbook on the fly.  I bought the onboard Social WiFi package, which allowed me to upload my photos to the Flickr gallery and still participate in the challenge.

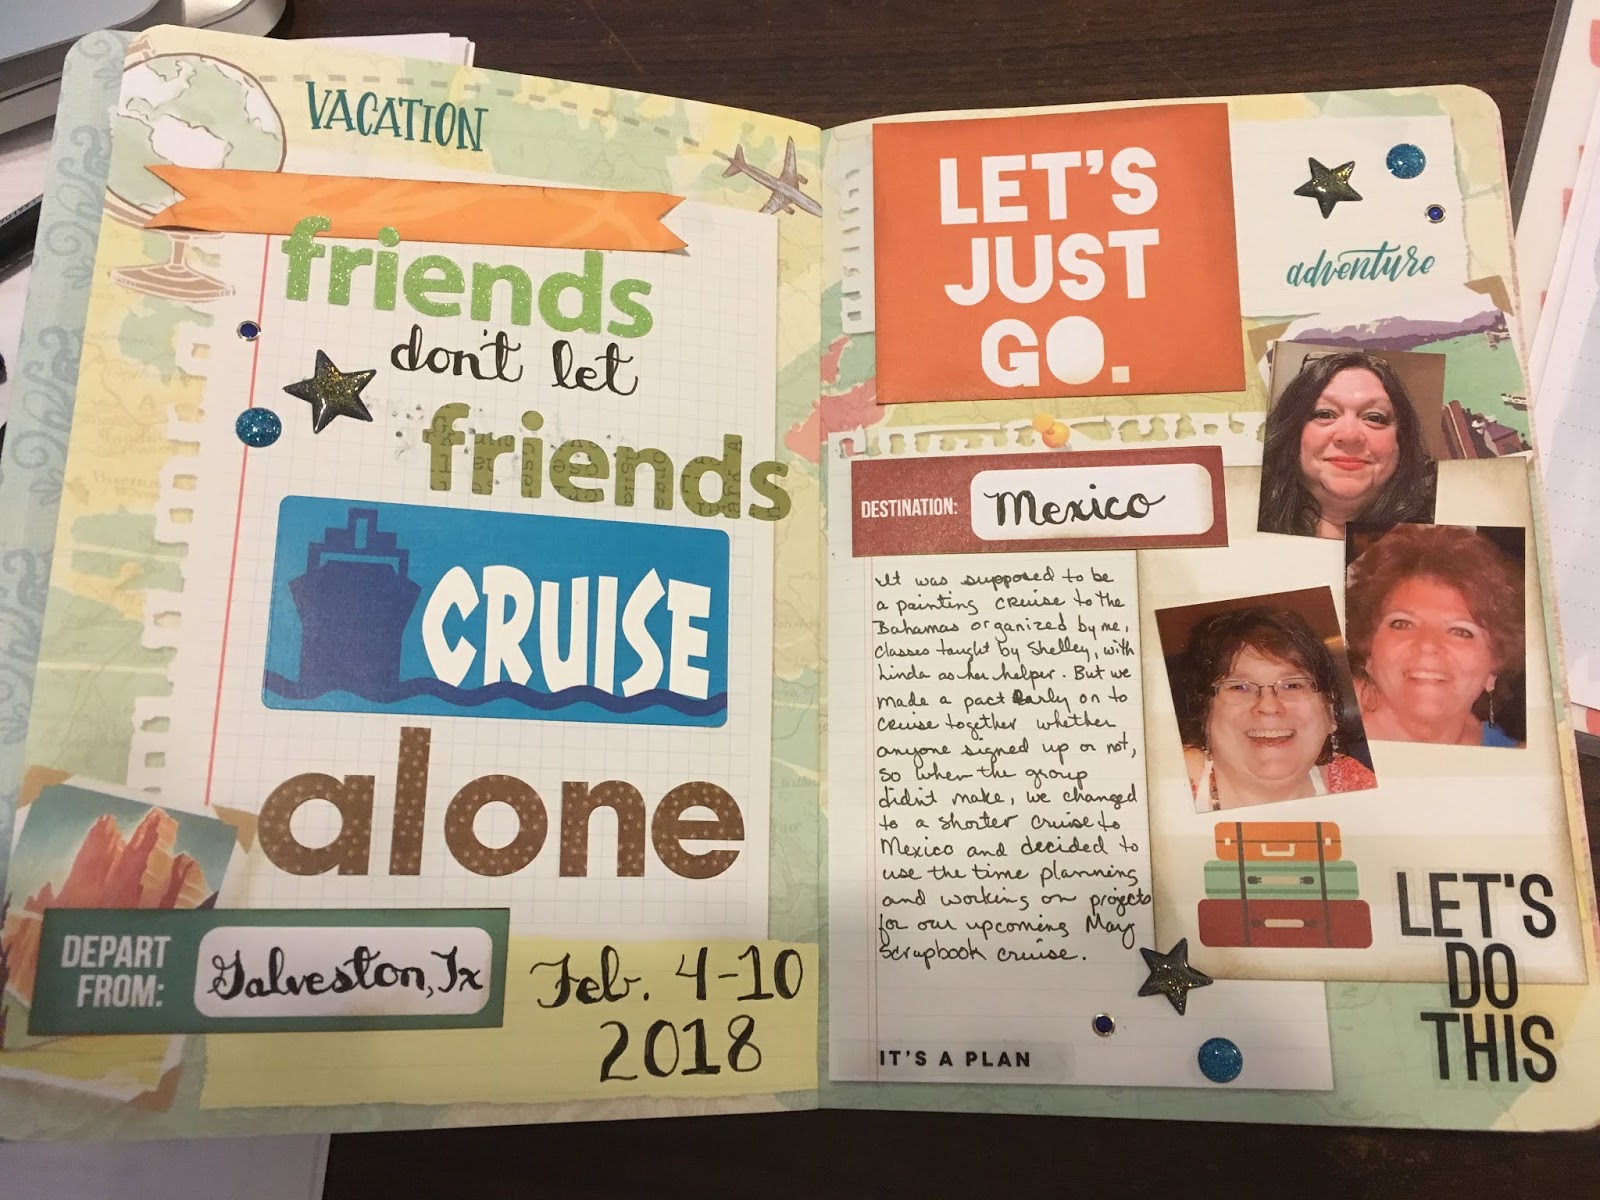
Scrapbooking in my travel journal during my August cruise (MINI LOAD).


Everything went okay for a day or two, but then the girls I was traveling with, my instructors, decided we needed to finish up some work we brought with us.  It turned into a much bigger project than we’d anticipated, and I spent most of the rest of the cruise working on that.  I didn’t get much scrapbooking done, and after I got off track, I didn’t do much on it at all.  Something similar happened in May, when I had yet anothercruise, this time one of our popular Scrapbooking Cruises we do each year.  I was so busy getting ready for the cruise, then teaching classes and leading the group that I fell off my proverbial wagon and failed to finish that LOAD, either. They say bad luck comes in threes, so yep, I missed out on the finish a third time in August, when the new owner, Alice Boll, decided to host a Mini LOADthat lasted one week.  It was right during the middle of a group cruise I organized for my Aggie Moms.  I did get some work done on that one, but not the whole week.  And I’m not sure whathappened in October, which I finally got to participate in because I finally broke down and joined Scrap Happy for the year.

So here we are…it’s February, I’m signed up for LOAD 219 (that’s Layout-a-Day February 2019), and I’m already behind! As I mentioned yesterday, I’m in the middle of a craft room reorganization (watch for a big reveal, soon!) and I have a lot of year-end (2018) bookkeeping that I’m trying to get done. So I missed the launch out of the box, and have been playing catch-up ever since.  I decided I would do 2 layouts a day until I get caught up, which should have taken me 2 days, but then I skipped a couple more days, and one of my pages took longer than I intended, and there are a million excuses, but I am catching up…AND…I am also starting in on Ali Edward’s “One Little Word” challenge at the same time…even though I’m starting it a month late!

Working on my One Little Word album.


So for today (and the next few days, too), I’ll be sharing with you my layouts from LOAD 219 and OLW, along with some info about my processes and supplies.  I hope you’ll enjoy it, and maybe it will give you some inspiration to challenge yourself.  After all, you don’t have to sign up for a challenge to create a layout every day.  Just get out your supplies and do something.  Be creative every day, whether it’s a scrapbook page, a card, something you made for your home, something from paper, something from fabric, or something you’ve drawn.  It all counts – as long as you DO IT!

2019 Scrapbook Expo!

Hey Neighbors!  A couple of weeks ago, I shared with you our day-trip to Mesquite, Texas for the Stamp, Scrap, and Art Tour.  My neice, Ashley, and I had a great time, and I bought a few supplies to get ready for some big things coming this February.  

First, we have Layout-a-Day, better known as LOAD 219, which started on February 1st(more about that tomorrow!).  The other thing coming up is Scrapbook Expo in Irving, Texas.  Now you may remember Scrapbook Expo as the big event held at the Gaylord Texan Hotel in Grapevine.  I always thought it was poor planning to host a scrapbooking event at that over-priced monstrosity, and it provedto be a bad decision last year when the Gaylord abruptly dumpedthe Expo reservation in favor of a client with deeper pockets who wanted the same date.  This forced the Expo to move to the Irving Convention Center (with only 2 weeks notice, btw), which turned out not to be such a bad thing after all.


As a whole, we actually wound up preferring the Irving location to the Gaylord.  The concessions were better, the classrooms were better, and everythingwas cheaper.  Our only real complaint was the parking and the distance of the hotel. At the Gaylord, we were guests at the hotel and only had to pay one parking fee for each car, which we parked right outside the door, and we could walk to our rooms.  In Irving, our hotel was down the street (although it was verynice), and we had to shuttle back and forth.  We also had to pay for parking every day if we wanted to have a car with us at the convention center, and it wasn’t as convenient to keep our food/coolers in the car for easy access.  But we did like the new venue, so we let the organizers know, and they blessed us with relocation to Irving again for 2019.

I’m super excited about Expo this year.  With the addition of two new hotels right across the street, we will again be walking distance from our rooms, and that means we don’t have to pay those stupid parking fees, and we can cross the street to get lunch, assuming we don’t decide to eat at the concession stand or one of the many food trucks that came by last year. We booked the hotel package with the Texican Court, and we’re really excited about trying out this nifty, Texas-themed hotel with a retro vibe.  Now I just need to figure out what I’m going to bring, and how I’m going to get it there!


I had already pretty much decided that I wanted to work on some of my travel albums during these crops. I have several “travelers journals” in progress that use the same supplies.  That was the easy decision.  Now I’ve just got to figure out what supplies I can’t live without, and what is the best way to get them there.  I haven’t posted about it much, because I wanted to wait for the big reveal, but I’ve been reorganizing my craft room.  The new set up is both more and less portable at the same time, depending on how much stuff I want to bring.  


Obviously, for a long weekend retreat like the one I’ll be doing in April, I’ll want to bring more stuff, and that’s okay because I’ve moved a lot of it to bins and totes that I can just throw into my car as they are (or with a bungee cord or two to hold them closed).  But for this shorter crop, where I don’t really need allof the supplies in these bins, I have the quandary of deciding whether to unload the needed supplies into another tote, take the bins as they are, or unload things from the bins and fill the space with other things I need. And I haven’t decided if it’s a good or a bad thing that this event is coming up in just 8 days or so.  Yes, I am anxious to go, but I really am anxious about getting all my work caught up, getting packed, etc.  And oh, did I mention that the day after I come home from this event, I’ll be flying out to California for a weeklong travel agent training? Hmmm…maybe I should get up and start packing!

What do you think? Are you going to Scrapbook Expo? How do you decide what supplies you will take to a long crop? Any other special things you like to do to prepare? Share your ideas in the comments!

Saturday, January 26, 2019

Make-n-Take with the Minc


I know it's been a while since I posted anything, so I thought I'd share a quick video from our afternoon at the Stamp, Scrap and Art Tour in Mesquite, Texas today.  My niece, Ashley, and I got to use the Heidi Swapp Minc to make a cute card, and we learned a few tips along the way. I've had one for a while, but I've never used it! This make-n-take was so fun and easy, it makes me want to get it out and play!  Check out this video we made.


You can see how easy this was, so I hope you learned something, and if you have one, but haven't used it, get that darned thing out of the box and make something!  I know I will!