Showing posts with label wedding. Show all posts

Tuesday, October 6, 2020

Wedding Invitations


I know I promised this a long, long time ago, and I thank you much for waiting so patiently while we got through a whole bunch of stuff. It was just too much for Christen and I to do all this work on the wedding AND find time to blog about it. I did make sure to take lots of pictures, so I hope you’ll think it was worth the wait as I start on this series of wedding posts. So without further adieu, I would like to share the invitations we made.
 

Christen and Travis chose to wait about a year before getting married so they could have time to save up for the big day and to give us plenty of time to make all the crafty things we wanted. They found the perfect venue soon after, and we kept getting asked whether they had set the date, so we decided to send out “Save the Date” cards.

I designed these myself in Photoshop, using several fonts I downloaded from the internet. These included Lightfoot Shadowed, Safina Fancy, Jazz LET, Playbill, Dakota, and Little Lord Fontleroy. I also used Helvetica font, which usually comes installed on most computers.

For printing, I sent my postcard to Got Print, my go-to printing company. They offer fast, convenient service, highly competitive pricing, and they even have a facility right here in North Texas. Before sending your designs for printing, you’ll want to make sure you have designed the front and back as two separate files. You may need to convert to CMYK color, so be sure to read the instructions carefully for the optimal file format and observe the bleed marks, etc. We chose full color on both sides 4”x6” standard postcard on 14 pt. Uncoated Cover paper. Choose the online Instant Processing Proof to speed up the service and keep the costs down. We paid $31.88 for 100 postcards, including tax and shipping. Larger orders offer greater savings.

We had a lot of ideas about the actual invitations, but after months of playing with a Silhouette cut file that wouldn’t cut all the way (just too intricate at that size), we gave up and ordered this die set from Amazon*. We made about 130 invitations in all, and it took us a lot longer to cut out than we had estimated. For one thing, this tiny intricate die didn’t always cut well. We wound up having to use a shim and we had to stop frequently to cut wax paper with it a few times to help it release the little bits and pieces. There are so many tiny pieces in this design that it literally shredded my Sizzix Die Brush Tool*. After that, we tried a soft-bristled toothbrush before we settled on a stiff brush from my Sonic Scrubber*. The combination of the stiff bristled brush and the above-mentioned wax paper worked well, if a bit slow.


The die we used comes in two pieces, as shown. One cuts the pocket and the other is an edge die, which has a score mark to be placed against the fold-line of your trifold invitation. This particular die was designed to create a 4" x 6" card -- NOT the standard A2 (4 ¼" x 5 ½") card most commonly used in the U.S. We searched all over for a die to make the right size, to no avail. So we decided to make do with this one. The problem we found with this was that it was very difficult to get the score marks exactly perpendicular to the length of the card and exactly where it needed to be scored since we couldn't line up the edges of the die perfectly. Rather than try to precisely place the die on the fold, we chose cut the paper into 5 ½” x 12” strips and used the die on one end. Once it was cut, we could score at the edge of the die-cut area and fold it inward before trimming to the desired length…in this case, a standard 4 ¼” x 5 ½” card. So basically cut first, score, then trim.


The pocket die also contains score lines to help with construction. Simply fold the tabs inward and add adhesive before sticking it to the right-hand flap of your card. I used ¼” Scor-Tape* for a sturdy hold. 


The remaining parts inside the card were printed on my laser printer using Stampin’ Up Very Vanilla paper and a brown-toned ink using the following fonts: Imprint MT Shadow, Bell MT, and Octavina Swash. The Octavian font came as a bundle I purchases a while back from FontBundles.net, however it is also available for free on various font websites. The paid version offers contextual and stylistic alternates for many of the letters. We also added a text embellishment from the Type Embellishments One LET font. Embellishments like these are fun to play around with, and sometimes you can create lovely embellishments by combining two or more into a single arrangement. 


Inside the card, we included the formal invitation (on the left) and a Details card and the RSVP card in the pocket on the right. Right before we sent the invitations, we decided to also add a COVID statement/request as another item in the pocket to remind our guests to wear masks. 

The invitation was held together with a 1” belly band, trimmed to size. The “buckle” on the band was created with Mirri Lava metallic rose gold paper from The Paper Cut and the Artisan Label punch from Stampin’ Up. The punch is discontinued, but there are many fine dies and punches that would work just as well. The inner part of the buckle was printed on Stampin’ Up Very Vanilla on my laser printer using the Little Lord Fontleroy font again. I simply built the design using multiple layers of boxes and text boxes, moving each layer around until I had it where I wanted it. It’s hard to tell from the photo, but it was actually printed in black and then Travis (my new son-in-law!) ran it through my Heidi Swapp Mini Minc* to foil it in Teal*.


The other products we used to create the invitations were:

Bazzill paper in the color Blue Oasis, which I ordered from my good friend and former Crafty Neighbor instructor, Karrie Allen at Scrapp’n Savvy in Conroe, Texas.


Kraft Cardstock Paper from Hobby Lobby* 


One more little thing...because of the weight and thickness of the complete invitation, we had to add more postage when we took them to the post office.  My advice...put them all together and take one to the post office to be weighed before you put any postage on them...there might be a single stamp in the right denomination!


I hope you’ve enjoyed this little tutorial on making these lovely and lacy wedding invitations!  I’ll be posting more of our wedding crafts and other tips and projects soon. Don’t forget to like and subscribe to this blog so you don’t miss out!

*Here are links to many of the products I used. As an Amazon Affiliate, I earn from qualifying purchases.

&nbsp &nbsp &nbsp &nbsp &nbsp &nbsp


Thursday, July 30, 2020

I Can Do That!

Hello crafty neighbors! I hope you are staying safe and healthy through all this crazy COVID situation, and if you are sheltering at home or working from home, I hope you’re not going too stir crazy.  It’s been a strange few months around here.  It seems like time is both speeding by and at a dead standstill. I don’t know how that’s possible, but it sure feels like the year is whizzing by, even though the days are all the same. My husband calls it “Blursday” because it’s often hard to tell what day it is -- the days all run together. In many ways, I feel like we are still in March, so how can it be near the end of July? What happened to all the time in between?
While nothing is really back to normal around here, we have managed to settle into some routines that help. Hubby is mostly still working from home, but he does have to go in from time to time.  We still aren’t allowing visits in our home from friends and family with the exception of my daughter and her soon-to-be family – we have too many wedding details to manage, so she really must be here. The wedding details have kept us super busy all summer, and I feel really bad that I haven’t kept up the blog posts about it as I had promised. Luckily, we’ve done so much work, I have plenty of material to do posts with, so I’m hoping to get back into the habit of sharing those details here.
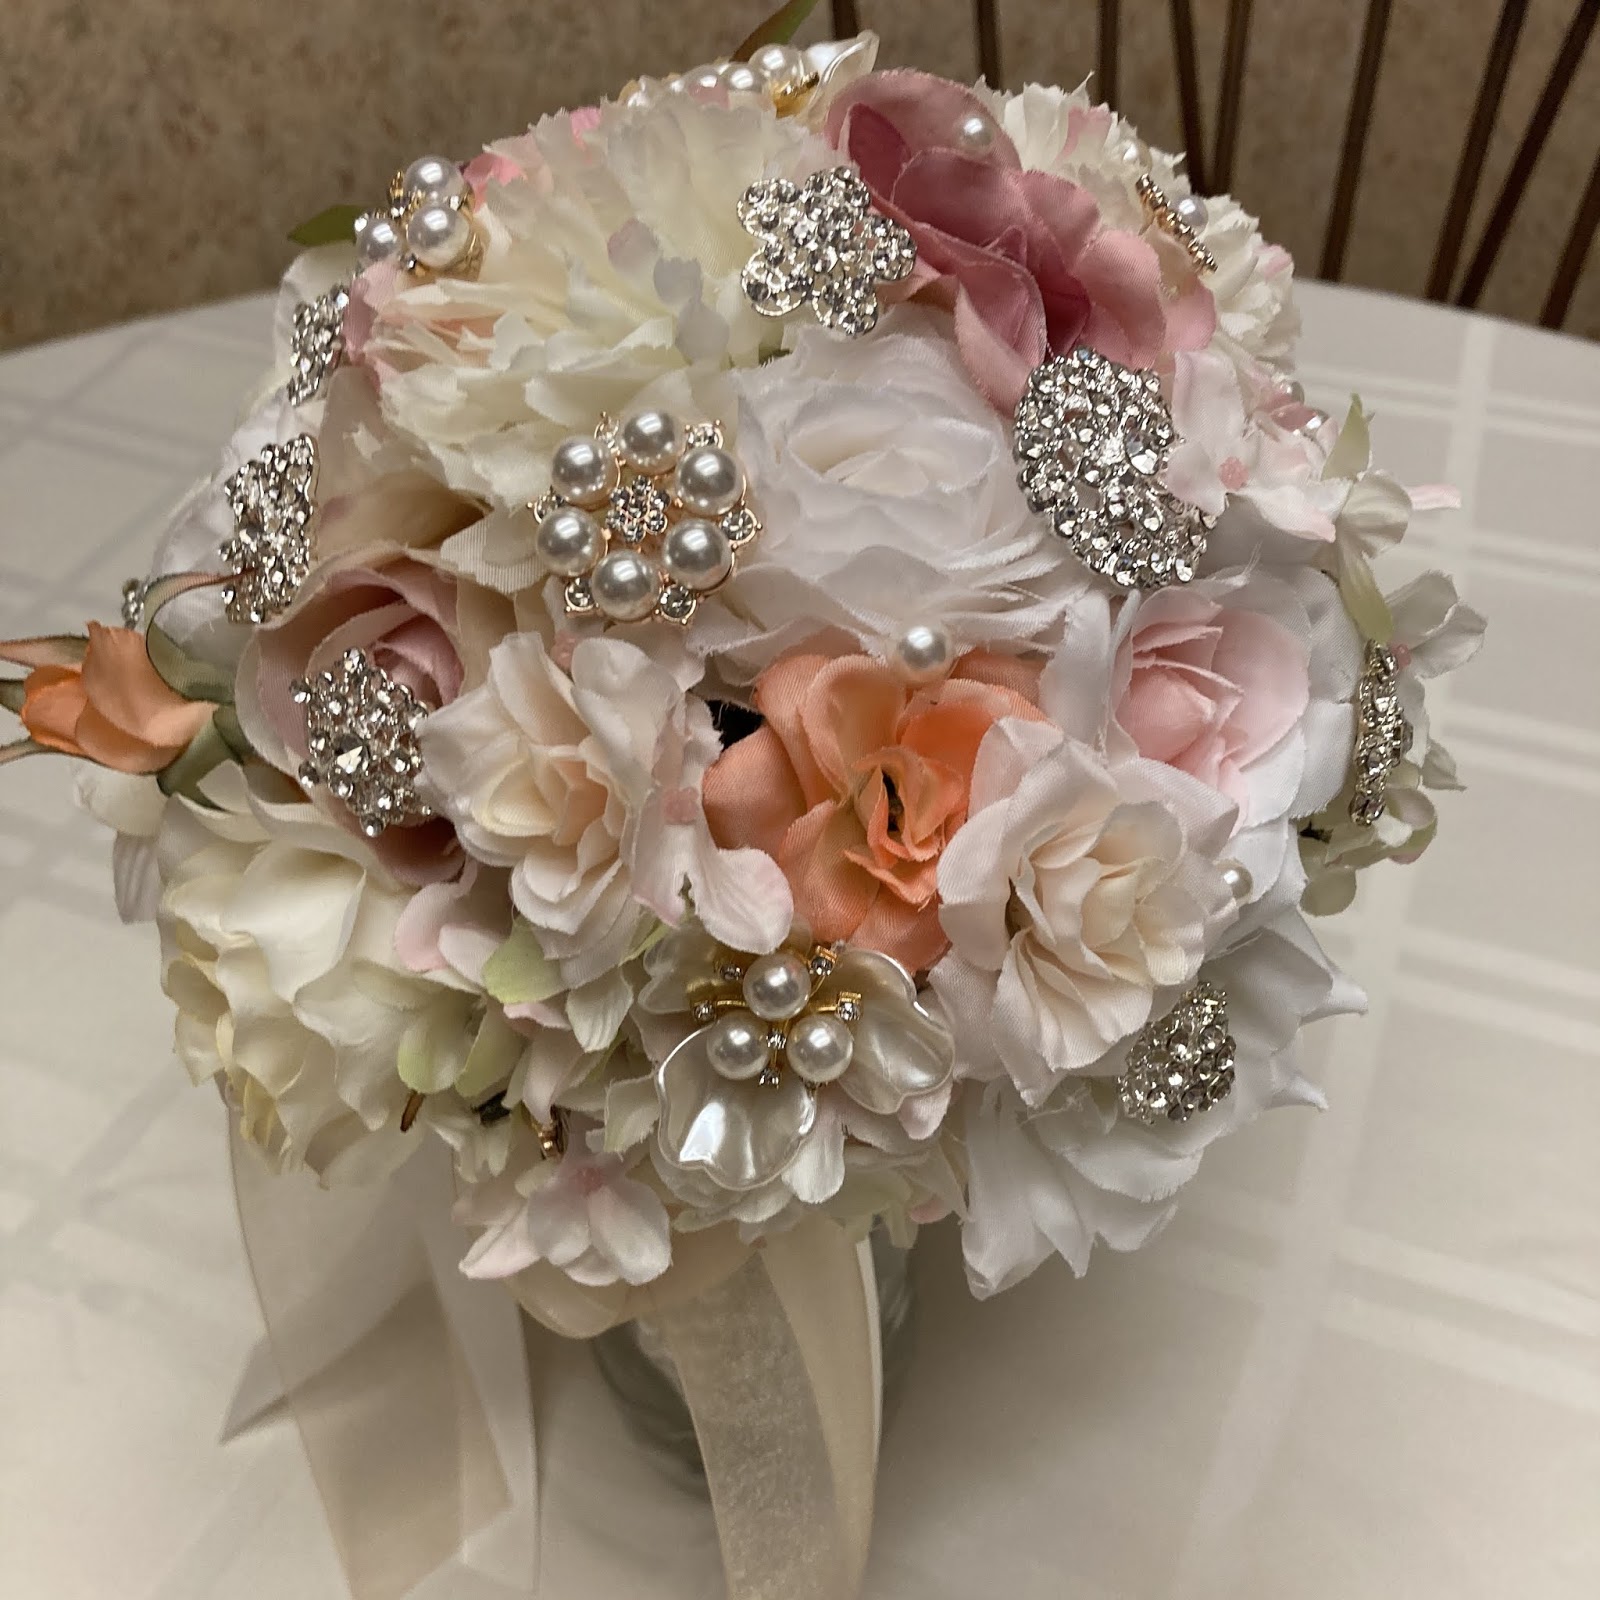
My most recent wedding projects have been making all the floral arrangements. We opted to do our own rather than spend a fortune on fresh flowers that wilt in a day. I  had long admired the beautiful brooch bouquets I saw on Pinterest, so we thought we’d give that a try. You can see some of the one’s we liked on my Pinterest board here. 
I started by ordering a large variety of brooches on Amazon.  I’ve linked below to some of the ones we found. I was really surprised at how inexpensive they were, but a little bit disappointed in the availability of brooches in rose gold. Most of what we found was traditional gold and silver, and with the tiny pictures that are often used, it can be hard to tell. Some of the brooches we ordered looked rose gold but turned out to be gold instead. It was okay, they still worked, but that was not what we were looking for.
Actually starting on making the bouquets was a bit daunting, and I kept putting it off as long as I could because I’ve never really done any floral arrangements and I wasn’t sure if I had the skills. In actuality, it turned out to be quite fun, and I think I did a pretty good job of it for a novice. I think the hardest part was settling on the design – there are so many ways to do it! 
We originally planned to use the wooden dowel and Styrofoam ball method, but the more I looked at those, the less I liked that perfectly round design. An alternative was to buy plastic forms, which were ok, but didn’t really match the esthetic of Christen’s country chic theme. Besides, it would mean yet another trip to Michael’s or Hobby Lobby, and we wanted to save money. We settled on a more natural look using the faux stems on some pretty little floral bundles we bought at Michael’s. If you’re being ultra frugal, you could use these just the way they are; they were tied up with raffia and are pretty much a bouquet in their own right. You could add a bit of ribbon or lace to dress it up and you’re good to go.
We wanted to add a little more variety to the flowers, but we liked the faux stems on these. Luckily, they slide right off and can be used on pretty much any floral stem. When I had the shape and flower placement the way I wanted, I bundled them off with rubber bands to hold them in place and started adding the rhinestones.
There’s a lot of variation in brooch bouquets…everything from all brooches and no flowers to all flowers with just a few brooches. We wanted a mix of both. There are also several different methods of adding rhinestones to the flowers. Originally, we planned to turn the brooches into floral stems by wrapping floral wire through them.  This method works really well if you are using the Styrofoam base, but not so much for bundling with natural or faux flower stems. Instead, we used the more common hot glue method, and it worked very well since we had a mixture of brooches of different sizes, both with and without pin backs.
The first one I did was the tossing bouquet, since it is often a smaller, simpler version of the bride’s bouquet. I figured it would be good practice and it would be okay if it was less than perfect. Once I made that one and was satisfied with how it looked, I had the confidence to proceed with the others. I sorted the remaining flowers until I had a good mix for each of the three remaining bouquets (Maid of Honor, Matron of Honor, and the Bride), and bundled the flowers as I had done with the tossing bouquet.  Adding the brooches was quick and easy and I had them done in no time. I started with the largest brooches first, then filled in gaps with smaller and smaller pieces until I was satisfied. I can see how easy it would be to fill the whole things up with brooches!
[Hot glue tip:  To prevent those spider-web strands of glue on your projects, let go of the trigger and whip the gun in a circle like you’re beating eggs before pulling away from the project.]
The finishing touches on the bouquet were lace handle wraps.  The bride’s bouquet was wrapped with a David Tuterra wrap we bought at Michael’s (don’t forget to use your coupons!). I wrapped the others in lace we had on hand, turning the cut edge under and hot gluing it into place. I added pretty ribbons and a bow, and they were done.


I’m really proud and excited about these bouquets, especially since I had never done anything like this before. It was super simple to do, costs hundredsless than any brooch bouquet you could buy online, and it gave me the confidence to do the other floral arrangements we needed. I hope this gives you the confidence to make one, too!

To view a list of the brooches we purchased on Amazon.com, view our list here.

Wednesday, April 29, 2020

My Month in Quarantine (Part 1)

Image created by articular - www.freepik.com
These are strange times, aren’t they? Two months ago, I could not have imagined that I would have spent the last six weeks confined to my home except for essential errands like groceries and the pharmacy. Two months ago, I was happily planning several craft weekends with my friends, getting my mom’s estate in order, and working on some big and exciting projects. Last month, everything changed.

If you’re like me, this crisis has meant a lot of changes in your home and work life, and you may find that you have a lot of extra time on your hands or that you’re busier than ever. As I’ve mentioned before, I’m a travel agent, and I typically work from home, but no one is traveling now. Most of my business has either cancelled or moved to later dates, and no one is looking to arrange new travel until this whole situation has settled down, and then who knows whether anyone can afford it since so many people are out of work. So basically, I’m out of work, too.

I had thought this bit of respite would allow me to catch up on a bunch of projects, and I could spend a lot of time crafting and reorganizing my studio. But all this free time I imagined I would have has completely evaporated into the ether of having 4 people living in the same house, cooking 3 meals a day, and generally keeping me busy and distracted.  So, when I mentioned last month that I had a project in the works that I was going to start sharing here on my blog, I really believed I was going to have time to do that, when in fact, this is the first chance I’ve even had to think about my blog. (sigh)

What was the big project I was going to share with you? My daughter’s wedding! Yes, I was very excited to share with you that my daughter got engaged last fall, and we are planning lots of crafty things to go with her rustic-chic theme. We wanted to do a lot of the work ourselves for a number of reasons. Obviously, we are both crafty people and have been hoping for the day when we could put our skills to work on a wedding, but doing the planning ourselves affords us more control over details, and in the long run, if we’re smart about it, a good bit of financial savings. For instance, pretty, laser-cut invitations generally start around $5 each, so for 100 guests, it would easily cost upwards of $500 for a simple card and envelope with inserts. Doing a card as elaborate as the one we designed (I’ll show it in a future post) would cost us over $1000. By making them ourselves, we may spend more time and effort on it, but will spend only $250 on paper and envelopes, and likely less than $350 once you add in printer ink and adhesives.

So with Christen’s wedding scheduled for August, we started planning our projects carefully and we scheduled work days on various weekends so that we could get it all done in time without having to rush. I was going to share those projects with you as we went along, but then the COVID lockdown came, and social distancing prevents us from getting together.  Fortunately, I did manage to get some pictures of the projects we completed before the shutdown, so I’ll share those with you, and hopefully we’ll be back to working on our projects together soon.

One of the trends we’ve seen on Instagram is a Remembrance Table featuring photos of deceased loved ones. We liked this idea because a lot of very dear people in our family have passed on, and we know they would be a part of this magical day if they could be. So in keeping with Christen’s shabby-chic theme, we opted to alter and distress the photo frames ourselves, which is very easy to do. We’re also going to use the frames for signs during the reception, so we estimated that we needed about 20. In order to keep this project inexpensive, but not cheap, we raided the stash at home before paying a visit to the Dollar Tree to see what they had. 


The frame in the center was treated with a torn paper decoupage.
The frame on the left was painted, distressed an then Christen added lace and pearls.

This was a Dollar Tree framed artwork, but we liked the frame,
so we added pearls.

This is one of several identical frames that were a reddish brown color.
Christen painted and distressed it before adding the burlap ribbon and flower.

You've probably seen these wooden frames in the dollar bin at Michael's.
Christen painted this one and then added some beautiful foil stickers.
 
I was really excited about the way this one turned out.
This was a clear acrylic frame that I recolored using alcohol inks.
The picture doesn't do it justice!

Another simple upcycle -- Christen added rhinestones to this
plastic gold frame we found at Dollar Tree. 

Another of the Michael's frames. Paint and embellishments by Christen.

There are two of these frames in two sizes.  Christen painted and distressed this one
before adding strips of bling.  The two rhinestones on the sides cover a metal
embellishment that didn't look good with the paint.


As you can see, we’ve used a lot of different techniques to dress up these frames. We’ve used acrylic paint, alcohol ink, lace, ribbon, pearls, rhinestones, metallic stickers, and even bits of old broken jewelry.  We had a few that didn’t get finished because we needed to spray paint, etc., but then the weather turned damp, so it will have to wait for warm sunny days. My only regret is that we failed to take any “before” pictures, so you could see what we’ve done. We'll post the remaining frames when they get finished.

So that’s it for this post, but I wanted to let you know about all the exciting project posts we have coming up.  In addition to the distressed picture frames, we’ll also be working on:

· 
  • Handmade pocket invitation suites
  • Floral arrangements and décor
  • Bouquets and boutonnieres
  • Bride’s Maids gifts
  • Favors
  • Recycled chandelier
  • and so much more!

Those posts will be popping up over the next few months as we work on different projects.  In my next post, I want to share with you another project I’ve been working on during this coronavirus crisis, and keep your eyes out for a video flip through of my 2019 One Little Word project and a sneak peak at my 2020 album.

Thanks for stopping by, and I hope you’re finding some time to be crafty!

Cindy Murray
Crafty Neighbor

Monday, June 2, 2014

I Do


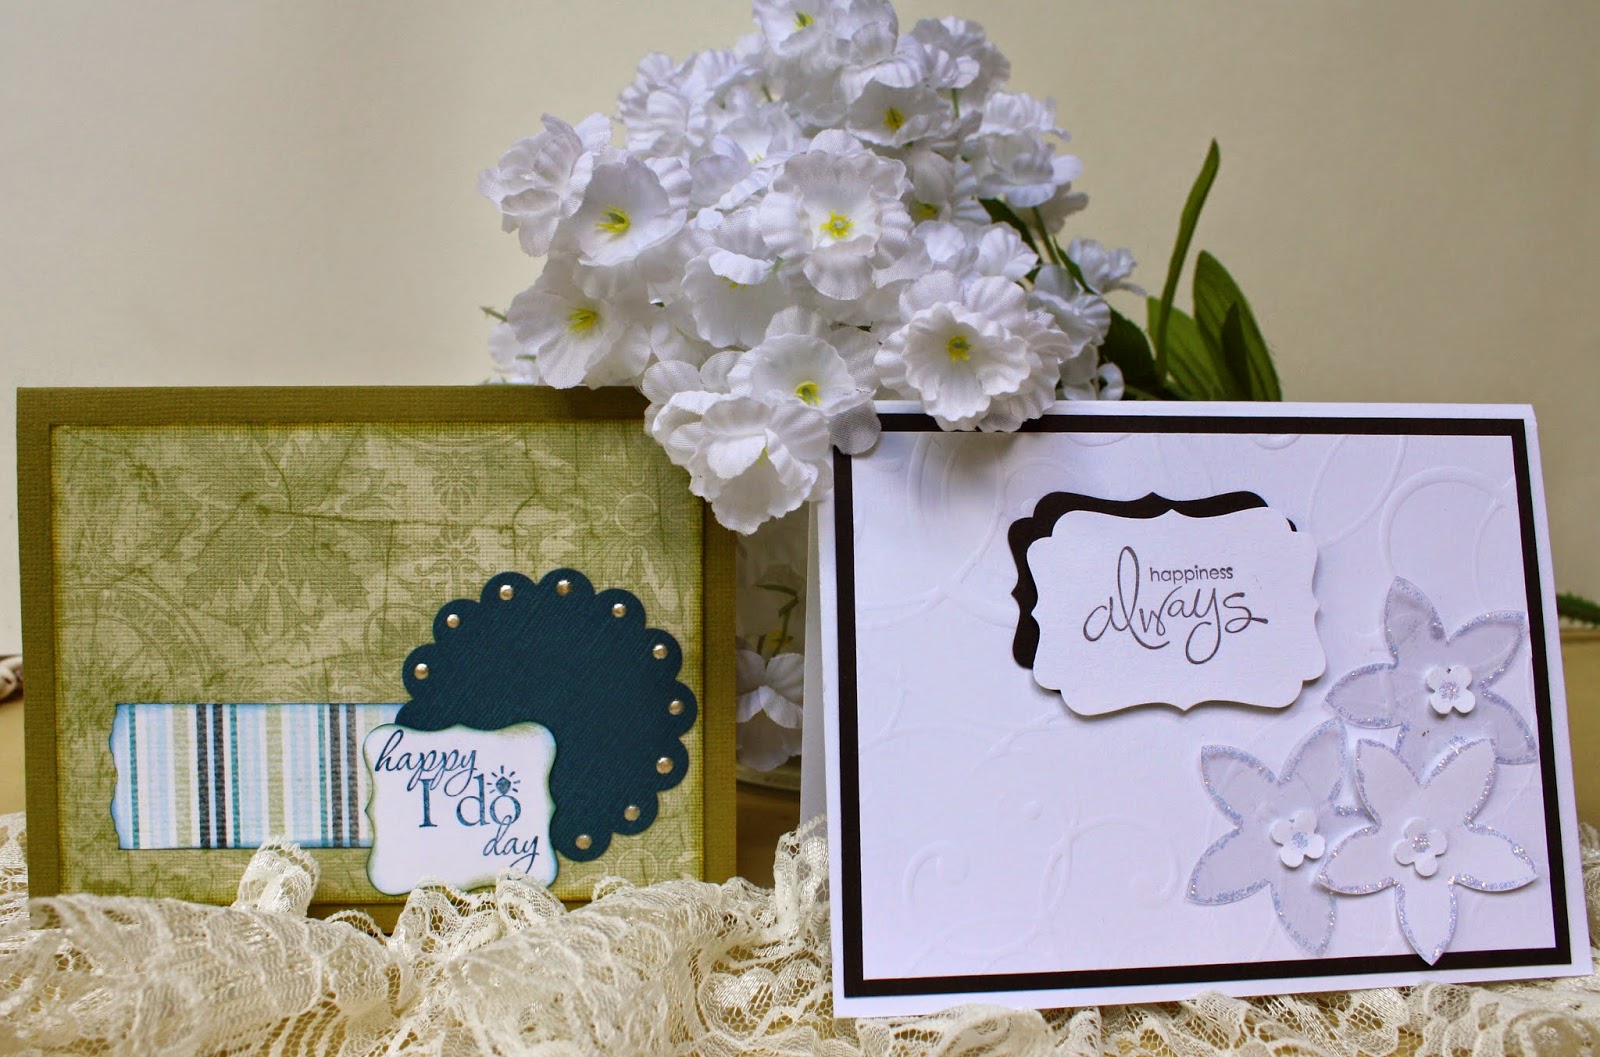
Today is the 2nd, and that means it’s time for the monthly Craft Squad blog hop.  If you came from Lisa Loves to Stamp, you are in the right place.  This month, our theme is “I Do,” and I thought it would be nice to take a break from all the page layouts and do some cards for a change.


Both of these cards use very little in the way of supplies.  For this first card, I used Stampin’ Up punches to create the flowers from white cardstock and acetate (transparency film).  I then edged the flowers with Stickles.  The sentiment is off-set on the same shape punched in black and popped up with foam dots. All this is set on an embossed background.  Simple, and quite elegant, I think.


The second card is a little more casual.  I used a piece of paper from DCWV’s Old World stack as the background.  The shapes were punched from scraps with assorted punches and dies.  I used liquid pearls to accent the scalloped circle, but you could use real pearls, too.  The stamps used on both cards are from Stampin’ Up.


I hope you enjoyed my cards today.  Please follow the link to Treasure Chest of Memories to continue with the rest of the hop.  The hop will be available through June 5, and my regularly scheduled posts will return on the 6th.  If you’d like to see more of my projects, please visit the archives, which you can access using the widgets on the left.

Wednesday, June 19, 2013

Happy Anniversary, Honey!


I hope you enjoyed our June Blog Hop.  If you haven’t had a chance to check it out, do click on over to my June 15 blog entry, “What June Means to Me” for the start of our monthly hop.  You’ll see some great projects from each of our Team LinkedIn crew and you can enter for a chance to win a fun little prize on each of the blogs!

If you did stop by this blog on the 15th, then I’m sure you saw my hop project, which was a very special 25th Wedding Anniversary card for my dear husband, Mark.    In case you were wondering, our anniversary is today (the 19th),  and we are currently enjoying a fabulous vacation in the city of New Orleans.  And since I’m out of town, it means I won’t be doing any projects for the next few days, so I did a very special one for you in advance of this day, and I hope it will be special enough to tide you over until I can squeeze in more time to post a few more blog articles when I get back.

As I mentioned on Saturday, June, for me, means brides, and after making that card for Mark (which as of this writing, he has not seen), I was inspired to do my very first page in my own wedding album.  Yes.  You read that right.  The first page in my wedding album.  You see, I purchased an album and papers years ago, and I even bought a few embellishments, but until now, I had not been inspired to work on it.  In fact, you might say I was afraid to work on it.  A wedding is a very precious thing, and I didn't want to create just any old scrapbook page, so I just didn’t do one at all.  But when I made that card, I started imagining what a page might look like, and I decided it was high time I made one!

Here’s my first wedding page:


As you can see, it is a very layered page.  I worked on it for about a week, laying out the pieces, moving them around, looking at it for a while and then moving them around again.  I had a sketch, and a general idea in my head, but sometimes when I laid out a piece, I decided I didn’t like it.  I finally finished it about 4:00 AM Tuesday morning, which gave me just enough time to take a few pictures and get two hours of sleep before we hit the road for our trip.  So I apologize for the terrible photo quality, and I will replace the photos with better ones just as soon as I can.


Since many of the papers and supplies were purchased a long time ago, I couldn't begin to tell you where they came from.  I’m pretty sure the ring embellishment was from Lil’ Davis Designs.  The embossing folder, banner punch, label die cut, stamp, and inks are all Stampin’ Up.  The bling and pearls came from Hobby Lobby’s bridal department.  The crocheted pieces were purchased from Paper Wings Productions and the flowers are by Prima.  The paper roses were cut using my brand new Art Philosophy cartridge.  I had a lot of fun playing with the different combinations of size and shape.

This page may have taken me a long time, and some people would say I spent too much time on it, but I really did want to make a page that I could fall in love with, and I think I accomplished that.  I would venture to bet that you have a similar project that you’ve either put off or spent way too much time on or obsessed about.  I’d love to hear about it!  And if you’d like to share, hop on over to our facebook page and post a picture of it!