Showing posts with label crafts. Show all posts

Friday, October 1, 2021

Handmade Halloween Happiness!


I’ve always loved holidays. Around the Murray house, any holiday is a good excuse to fix up the house, dress up the kids (and me!), and whip up some good food. Halloween is no exception, and I’ve spent a lot of that “dress up” time coming up with some fun costumes for my kids and myself. In fact, it’s been a sort of challenge to see what I can come up with each year. 

I think it all started when I was a kid. Back then, there weren’t so many ready made costumes…just the plastic masks that had cutouts for your eyes and even tinier holes for your nose and mouth. My mom would often buy us the mask (they didn’t cost that much) and then make our costumes to go with it. The earliest one I remember was (I think) either a Cinderella or Snow White mask, and my mom took an old curtain, some glue, and silver glitter and turned it into a cape.  I was a princess! But I actually have a photo of one that’s even older…me in a white-haired wig.  I wasn't even a year old yet, and I have no idea what I was supposed to be. Later, someone made matching clown costumes for my aunt and me and we just continued the tradition until it was time to make costumes for my own kiddos.

Making your own costumes does NOT have to be hard, and believe it or not, it very rarely even requires any sewing. One of my most famous costumes (or maybe I should say “infamous”) was the zebra outfit I wore to work one year. It was HOURS before anyone figured out who I was, and so I won the prize for best costume. All it took was a zebra stripe Uni-tard, black boots, black gloves, some black and white face paint, and a banana hair clip – all of which I already owned.


My daughter loves homemade costumes as much as I do. When she was a child, I once rolled her hair in curlers, slathered on white face-paint, dressed her in PJs and a robe with house shoes and called her a “Housewife”, complete with rolling pin. She’s also been a princess, a bug, a fairy, a mouse, a witch, Dorothy from the Wizard of Oz, a cheerleader, a clown, a gypsy, a hippie, and a punk rocker (twice). 


 My son has been a bunny, the devil, a pumpkin, a “California Raisin”, the Karate Kid, a soldier (after 9/11), a vampire, a Dickens-esque ghost, and a musketeer, but one of our favorites was the year after the Olympics when he dressed as Michael Phelps, including 7 shiny gold medals.


The internet (and especially sites like Pinterest), has really been a great resource for finding ideas for homemade costumes. It’s a lot of fun, to see how much detail you can add using things you already have. I’m trying to decide what I want to be this year when I open the door for all my neighborhood trick or treaters. How about you? Share your costume ideas in the comments, or start a discussion over in our Crafty Neighbor Facebook discussion group: Crop and Craft Events.


Until then, Happy Hauntings!

Cindy


Friday, July 30, 2021

Crafting When We Travel

As we wrap up July here at Crafty Neighbor, we are still focusing on crafting when we travel. I love taking my crafts with me when I travel, and I’ve been known to take crochet, embroidery, and, of course, scrapbooking along on my trips. Packing projects like embroidery and crochet are pretty straight-forward; you just need needles or hooks, thread or yarn, some scissors, and a pattern. But traveling with paper-crafting supplies can be a bit more challenging, especially if you are someone like me who likes to take everything I own. I have been known to completely fill my SUV with supplies when I head out to a retreat, but I’m trying to learn to bring less so I can get more done.

I recently went on an over-night canoe trip with my family, and my daughter and I both wanted to take our craft supplies along so we could document our trip. Since we have such limited space in our canoes (and not a lot of time for documenting), we restricted our supplies to travelers notebooks and a simple set of drawing/journaling tools. 


For this minimalist kit, I included three pens: a Tombow Mono Twin, and two Tombow brush pens, a hard tip and a soft tip. I also brought several pencils of varying hardness, including a .9 mm mechanical pencil, 4H and B graphite pencils, 3 black charcoal pencils (4B, 5B, and 6B), a white charcoal pencil, and a white 2B colored pencil. I also threw in a pencil sharpener, a Tombow Mono eraser, and a couple of bulldog clips to hold the notebooks open/closed as necessary. Since we were in canoes, we stored them in water-proof zipper bags. The idea behind this kind of kit is to do more drawing and journaling. I can still leave room for photos, but I will add those later. Mainly I just want to get the stories into the book before I forget them.


For other kinds of travel, I will often add other supplies to my kits. A cruise to the Bahamas for an Aggie Mom’s fundraiser in 2016 allowed me to bring my dual-tipped Stampin’ Up markers (which I am slowly replacing with Tombow markers), scissors, glue pens, Wink of Stella brushes, a white Uniball Signo pen, Tombow Mono adhesive, a Xyron adhesive eraser, a corner rounder punch, a small blender sponge (for use with the markers), Scor-Tape and red line tape, a 6”x6” paper pad, StazOn ink, and a very small assortment of stamps (numbers, letters, weather, travel). In the end, I wound up with a lot of things I never used, so for later trips, I went back to a more minimalist approach with just a few items.


My travel kits have evolved a lot since then. The addition of an HP Sprocket photo printer has allowed me to add photos on the spot to my cruise scrapbooks. And since the printer runs on a USB charge, there was no need for electricity. Washi tape allows me to tape ephemera and memorabilia into the album without gluing it down. And the pens, markers, and pencils change according to whatever is my favorite at the time.


When I traveled to Las Vegas last summer with my daughter’s bachelorette party, we both took along craft supplies for documenting in our traveler’s notebooks. My kit this time included stickers, an assortment of diecuts, a Tim Holtz Tiny Attacher, a date stamp, alpha-numeric stickers, a small assortment of patterned papers, the usual pens and scissors, Versa Fine black ink, a black Uniball Signo pen, plus my watercolor pencils and my Canon Selphy printer (great for photos up to 4”x6”). What got left behind? All those colored markers, most of the stamps, the Wink of Stella, and the blender sponge. This kit fit in my suitcase with my other belongings, and has become my standard go-to kit for traveling.


Sometimes, when I am going to be crafting only for one day, I will bring a single project to work on. For instance, one year at our Think Pink crop, I brought my Christmas cards to work on. The supplies for this were very limited: cardstock, scissors, paper trimmer, adhesive, Score-Pal, ink, and a stamp. I’ve also been known to bring my planner and a few stickers, or a bullet journal and pens. I’ve also brought mini albums I made in a class and finally took the time to add photos and journaling.


Learning to take smaller kits and one-off projects has helped me get more done when I do travel. When I bring too many supplies, I find that I actually get less done because I spend more time setting up my crafts and choosing supplies and less time actually crafting. Plus it’s a nice change not to lug all those supplies around in a second suitcase or tote bag. 


You can read more about taking crafts with you when you travel in our August newsletter, which will go out on the 1st. Brandi is going to share her travel kit, and I’ll have a new blog article about documenting your travels on the go. Be sure to subscribe to the newsletter at http://eepurl.com/TZULf, and you can subscribe to this newsletter using the links on the left.

Saturday, February 13, 2021

Words Have Power


 Howdy, crafty neighbors! This month in our newsletter, Brandi Reyna will be introducing the Crafty Neighbor Craft of the Month (CotM for short?) a new theme that will be featured across all our Crafty Neighbor media from the newsletter to Facebook, blog, and Instagram. I hope you’ll enjoy this new segment; we think it will be a great way to help us dig deeper into our various crafts and widen our skills and knowledge in some unique ways.

Our topic this month is The Power of Words: Planning and Goal Setting. Back in 2012, I wrote several blog articles about using power words as part of my 365 art journaling project. (I’ve linked those articles below.) My use of power words has evolved in the last nine years, but my belief in the power of words has stayed the same. In her novel, A Handmaid’s Tale, Margaret Atwood wrote,

 “A word after a word after a word is power.”

And even Mother Theresa proclaims,

 “Kind words can be short and easy to speak,
but their echoes are truly endless.”

The idea of a power word is not a new one.  My son’s high school orchestra used power words in a unity circle before every concert.  Each student would share his or her word and the idea was that in unity, all these powerful words come together to make a whole, cohesive orchestra. 

Blogger Christine Kane uses power words in a different way.  She contends that your power words give you intent.  Each year, instead of making New Years resolutions, she does a lot of soul searching and comes up with her Word of the Year.  The word becomes her touchstone to stay focused on what’s important and to remind her of her goals. You can read more about it in that link above, and she even offers a free worksheet to help you find the right word for you.

Since 2012, I have been choosing an annual that has helped me change and grow and learn a lot about myself in the process. In 2013, I used my word as the foundation of my 365 art journaling project mentioned above, and I continued to work in that art journal using various words over the years. For the last three years, I have been doing so through a process designed by Ali Edwards called One Little Word. One Little Word is an online workshop with monthly prompts that guide you through exploring your word. I posted flip-through videos on my YouTube channel that illustrate two of the albums I created as part of One Little Word. This year, I’m working in a journal rather than a pocket album, which is providing a different experience in the creative aspect, but is just as effective at facilitating the process of growing in my word. In fact, I’ve worked many of the prompts exactly the same as in previous years, but in a flatter bullet journal style, which has really challenged my creativity. You can see most of my 2021 project on my Instagram and Facebook feeds. 

Here are a couple of examples of some of the work I’ve been doing:

My 2021 vision board.

A page in my OLW journal.

A page in my OLW journal.

A page in my OLW journal.


This year, I have also committed to exploring Lara Casey’s Cultivate What Matters Power Sheets goal planner. It’s yet another way to set some intentions and build on what you are doing with your power word. In fact, part of the prep work that goes into Power Sheets is a step that helps you find the right word. Power sheets can be started any time and there is even an undated, 6-month planner if you want to give it a try without a full-on commitment. Christine Kane’s worksheet is free, but both One Little Word and Power Sheets are paid products. These are all great places to start, but you can also do what I did when I first started – just find a word and find some projects that speak to you and let you express and explore that word. I’d be interested to see where it takes you.


A page in my Power Sheets workbook.
 

For more information:

*As an Amazon Affiliate, I earn from qualifying purchases.

Thursday, July 30, 2020

I Can Do That!

Hello crafty neighbors! I hope you are staying safe and healthy through all this crazy COVID situation, and if you are sheltering at home or working from home, I hope you’re not going too stir crazy.  It’s been a strange few months around here.  It seems like time is both speeding by and at a dead standstill. I don’t know how that’s possible, but it sure feels like the year is whizzing by, even though the days are all the same. My husband calls it “Blursday” because it’s often hard to tell what day it is -- the days all run together. In many ways, I feel like we are still in March, so how can it be near the end of July? What happened to all the time in between?
While nothing is really back to normal around here, we have managed to settle into some routines that help. Hubby is mostly still working from home, but he does have to go in from time to time.  We still aren’t allowing visits in our home from friends and family with the exception of my daughter and her soon-to-be family – we have too many wedding details to manage, so she really must be here. The wedding details have kept us super busy all summer, and I feel really bad that I haven’t kept up the blog posts about it as I had promised. Luckily, we’ve done so much work, I have plenty of material to do posts with, so I’m hoping to get back into the habit of sharing those details here.
My most recent wedding projects have been making all the floral arrangements. We opted to do our own rather than spend a fortune on fresh flowers that wilt in a day. I  had long admired the beautiful brooch bouquets I saw on Pinterest, so we thought we’d give that a try. You can see some of the one’s we liked on my Pinterest board here
I started by ordering a large variety of brooches on Amazon.  I’ve linked below to some of the ones we found. I was really surprised at how inexpensive they were, but a little bit disappointed in the availability of brooches in rose gold. Most of what we found was traditional gold and silver, and with the tiny pictures that are often used, it can be hard to tell. Some of the brooches we ordered looked rose gold but turned out to be gold instead. It was okay, they still worked, but that was not what we were looking for.
Actually starting on making the bouquets was a bit daunting, and I kept putting it off as long as I could because I’ve never really done any floral arrangements and I wasn’t sure if I had the skills. In actuality, it turned out to be quite fun, and I think I did a pretty good job of it for a novice. I think the hardest part was settling on the design – there are so many ways to do it! 
We originally planned to use the wooden dowel and Styrofoam ball method, but the more I looked at those, the less I liked that perfectly round design. An alternative was to buy plastic forms, which were ok, but didn’t really match the esthetic of Christen’s country chic theme. Besides, it would mean yet another trip to Michael’s or Hobby Lobby, and we wanted to save money. We settled on a more natural look using the faux stems on some pretty little floral bundles we bought at Michael’s. If you’re being ultra frugal, you could use these just the way they are; they were tied up with raffia and are pretty much a bouquet in their own right. You could add a bit of ribbon or lace to dress it up and you’re good to go.
We wanted to add a little more variety to the flowers, but we liked the faux stems on these. Luckily, they slide right off and can be used on pretty much any floral stem. When I had the shape and flower placement the way I wanted, I bundled them off with rubber bands to hold them in place and started adding the rhinestones.
There’s a lot of variation in brooch bouquets…everything from all brooches and no flowers to all flowers with just a few brooches. We wanted a mix of both. There are also several different methods of adding rhinestones to the flowers. Originally, we planned to turn the brooches into floral stems by wrapping floral wire through them.  This method works really well if you are using the Styrofoam base, but not so much for bundling with natural or faux flower stems. Instead, we used the more common hot glue method, and it worked very well since we had a mixture of brooches of different sizes, both with and without pin backs.
The first one I did was the tossing bouquet, since it is often a smaller, simpler version of the bride’s bouquet. I figured it would be good practice and it would be okay if it was less than perfect. Once I made that one and was satisfied with how it looked, I had the confidence to proceed with the others. I sorted the remaining flowers until I had a good mix for each of the three remaining bouquets (Maid of Honor, Matron of Honor, and the Bride), and bundled the flowers as I had done with the tossing bouquet.  Adding the brooches was quick and easy and I had them done in no time. I started with the largest brooches first, then filled in gaps with smaller and smaller pieces until I was satisfied. I can see how easy it would be to fill the whole things up with brooches!
[Hot glue tip:  To prevent those spider-web strands of glue on your projects, let go of the trigger and whip the gun in a circle like you’re beating eggs before pulling away from the project.]
The finishing touches on the bouquet were lace handle wraps.  The bride’s bouquet was wrapped with a David Tuterra wrap we bought at Michael’s (don’t forget to use your coupons!). I wrapped the others in lace we had on hand, turning the cut edge under and hot gluing it into place. I added pretty ribbons and a bow, and they were done.


I’m really proud and excited about these bouquets, especially since I had never done anything like this before. It was super simple to do, costs hundredsless than any brooch bouquet you could buy online, and it gave me the confidence to do the other floral arrangements we needed. I hope this gives you the confidence to make one, too!

To view a list of the brooches we purchased on Amazon.com, view our list here.

Tuesday, March 3, 2020

Caregivers, Worker Bees, and Little Bits of Crafting

Have you ever wondered what it would be like to have to care for an aging parent? I did not. Well...I did, but then I quickly realized I am not cut out for the nurturing care-giver and put it entirely out of my head.  That was my sister's job.  I was a worker bee.  I owned my own business, I volunteered with charities that were important to me, and I stayed busy all the time. My sister, Patsy, was the nurturing type. She went to nursing school until her own medical issues put a stop to the, and she always swore she would be the one to take care of my parents when they got old. And she did.  She took care of my dad through recovery from a heart-attack, gall-bladder surgery, and over a year of hospice care. She took care of my mom through all that, too, and I was glad for it...especially since I live 300+ miles away.

Then the unthinkable happened...my sister died unexpectedly, leaving her handicapped, adult daughter and my mother, who was already beginning to show the signs of dementia. I moved my 29-year-old niece to live with me in the city so she could get a good education and learn to live on her own (public transportation should NEVER be underrated!), and eventually, we convinced my mother to move from her paid-off home in rural Texas into a senior living community where my brother and aunt could help take an eye on her. That didn't last long, though, as her needs were far greater than I had known, and she was already incapable of independent living.  Add to that the fact that she had squandered her retirement by pulling all of her investments during the stock market crashes of the early 2000's, and then she lost her job, losing her medical and life insurance benefits in the process.  All that to say that in January, Mom moved into my remaining guest bedroom, and now we have a household of four with some very distinct, and often time-consuming, needs.

Being a caregiver has put strains on my family and me that I could never have imagined, and it's made it even more important to me to get in my crafting time whenever I can. It hasn't been easy, but I've found that if I break things down into smaller tasks, and squeeze them in whenever I have an opportunity, it really gives me the outlet I need to calm my mind, let go of stress, and just zen out for a little while.  For example, today, I had to take my niece to the doctor.  I didn't want to go inside with all the sick people, and I could have sat in the car playing on my phone, but instead I took a portable project (embroidery) with me to work on while I waited outside.  I didn't get a lot done, but it was a lot more enjoyable and productive than sitting in that doctor's office with a bunch of sick people playing "Words with Friends" (nothing against WWF).

The start of some flowers on an apron.


So whether you're a caregiver, a worker bee, or just someone with a lot of hats to juggle, the truth is there will always be things that get in the way of crafting time. Whether it's a deadline a work, a sick kid, a second job, etc., you can't let it consume your life. Making the time to craft is not only possible, but necessary.  We all need those few precious moments of space where we can let go of the stress of the day and find something beautiful in our lives to experience and celebrate. It doesn't have to be a marathon weekend of crafting, or even an hour...just grab yourself five minutes when ever you can while you're watching the evening news, taking your 15-minute break at work, waiting for the roast to cook, or sitting at the doctors office or carpool line.  Just do it. Your body needs it, your brain needs it, and you'll be really glad you did!


Friday, April 15, 2016

Everything's Coming Up Aggie!


You may have wondered why I haven’t been posting as much lately.  I blame my son.  He just had to go off to Texas A&M University, an institution that some may claim is a cult.  Well, sure enough, I drank that maroon Kool-aid right off the bat, so I am just as indoctrinated in that culture as he is, and I’ve been volunteering with the Denton County A&M Mothers Club ever since.

The Aggies have a funny saying, “From the outside looking in, you can’t understand it.  From the inside looking out, you can’t explain it.”  Texas A&M and the Aggie Spirit have a way of grabbing you and making you feel like you’re home…like this is the group you should have always belonged to.  You wonder why it took you so long to find it.  And if you’re lucky enough to be born into it, you can’t imagine ever belonging anywhere else.  The Aggie network is a brotherhood and sisterhood of all Aggies.  They recognize each other from across the room and they are drawn to each other to share their love for that little school on the Brazos.  It’s not so little now, boasting some 50,000 students, but it still feels like home.

One really unique feature of Texas A&M is the Aggie Moms clubs.  The first club was started in 1921 when the mother of one of the students decided there was no female influence on the young men attending what was then an all-male, all-military school.  The mom’s club started by bringing some welcome home-cooking to the cadets and staff, and has since evolved into a far-reaching organization that supports the school, provides thousands of dollars in scholarships every year, and so much more.  I’ve met so many wonderful ladies through this organization, many with children who graduated long ago.  That’s why I signed up to help with the Aggie Mom Boutique four years ago, and I’m still at it!

This past weekend was  Texas A&M’s annual Parents’ Weekend, where the school invites the Aggie families to spend a few days on campus touring classrooms, attending banquets and awards ceremonies, and, of course, spending money that helps this fine educational establishment.  One of the things parents spend money on is the Aggie Moms Boutique, a craft show to end all craft shows featuring none other than…you guessed it…everything “Aggie” that you can imagine.  Picture two huge ballrooms full of maroon – it’s hard to imagine!


As the Co-Chairs of this year’s Boutique for Denton County, my partner, Alisa, and I were responsible for filling up 5 tables with assorted products of our choice, which you can see below.  Alisa and I made some of these items, and some were purchased or were donated by other Aggie Moms from Denton county.  In our booth we had etched glassware (a huge hit!), decorated picture frames, some altered windows, hand knitted items, sterling silver charms and other jewelry, Christmas ornaments, and, of course, fliers for our Fundraiser Cruise.


So why did I share all of this with you today?  Well, for inspiration, of course!  Maybe you’ll be inspired to check out Texas A&M University for yourself.  Or maybe you can start one of these unique clubs for your school to raise money for scholarships.  You might even be inspired by some of the crafty things we’ve made – you don’t have to make them maroon!

To get an up-close peek at some of our crafty projects, visit our photo album here.

P.S.  If you or your organization is interested in participating in or organizing a fundraiser cruise, please contact me at Crafty Neighbor Travel!  I would love to help you with a cruise, or you are welcome to join ours!

Sunday, December 1, 2013

Bon Voyage!


It’s finally here!  The day of our embarkation has arrived!  After all the cold weather in the metroplex, the girls and I are looking forward to a few days in the sun on our scrapbooking cruise to Roatan, Honduras, Belize City, Belize, and, of course, Cozumel, Mexico.  I sometimes wonder if the cruise lines have some kind of special arrangement with Mexico that requires all ships in the Western Caribbean to stop at the island of Cozumel – we go there every cruise, and I don’t think that will ever change.

One thing on our cruises that has changed is the level of service provided by Crafty Neighbor.  Over the last few years, we have added lots of amenities to our scrapbooking cruises, including what we affectionately refer to as “Pillow Gifts”.  Pillow Gifts are a small gift from the Crafty Neighbor instructors to our scrapbooking guests which we have arranged with the ship’s crew to be delivered to their rooms each night.  Since this is usually done around the time that the steward turns down the beds, they tend to set them out along with the towel animals and ship newsletter, and thus they are refered to as Pillow Gifts.

I like to extend the gift-giving even further.  I really want my cruise guests to feel special and to feel like they got a really good value for their money.  Since we recommend that our guests arrive in the Galveston area the day before we sail, we usually arrange a meet and greet with them to get to know everyone before we sail.  As a way of saying thanks, I have started the habit of giving them a special pillow gift as well.  Obviously, I can’t get into their hotel rooms to deliver the gifts, but the thought is still the same. 

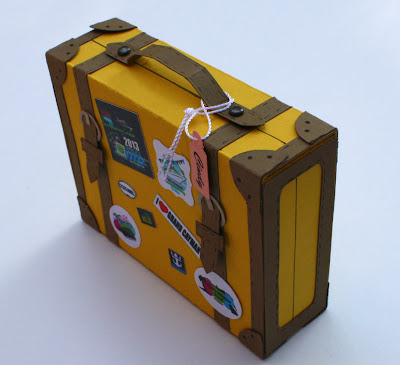
So last night we met up in Galveston before the cruise and I gave everyone there a little pillow gift to say thank you for being here.  I like to make the gifts special and meaningful.  For this year’s hotel pillow gift, I selected this little suitcase made from a simple matchbox pattern. 


If you look closely at the suitcase, you can see there are a lot of fine details.  It looks very intricate, but it was actually very simple.  I even made “bumper stickers” for each suitcase which were customized for the number of cruises each person has sailed with us.  For instance, one of our new cruisers gets stickers for Honduras, Belize, Cozumel and Royal Caribbean, while my roommate and former Crafty Neighbor, Stephanie, has stickers for all of the above plus Progresso, Jamaica, Grand Cayman, and Carnival.  I also have stickers for the emblem of each successive cruise.  I even put a little luggage tag on each one with their name.

Inside the boxes, I made a little “Cruise Survival Kit” that included some things like clothespins, safety pins, paper clips, lip balm, a bandaid, and more, along with a stamped message.


If you like this suitcase, look for a kit to be available some time after the cruise with complete instructions.  We will also have the instructions available for download as well.

I hope you enjoyed our first pillow gift from the cruise!  Stay tuned tomorrow as our grand adventure really begins!

Thursday, October 17, 2013

All Treats, No Tricks!


Welcome to Crafty Neighbor’s “Neighborhood Gossip” blog, a proud participant in the “All Treats, No Tricks Blog Hop”!  To start at the beginning of the hop, please visit The Little Blue House where you can learn how you can win one of 11 FABULOUS PRIZES.


For those of you visiting my little blog for the first time, please allow me to introduce myself.  My name is Cindy Murray, and I am the owner of Crafty Neighbor and Crafty Neighbor Travel.

I often call myself an event organizer, but really, Crafty Neighbor is so much more than that.  I host crops, retreats, classes, workshops, and even scrapbooking cruises and garage sales, but my real mission is to bring crafters together and support the scrapbooking and paper-crafting industries by providing fun and unique opportunities to learn new techniques, scrapbook at different venues, and meet new friends.  I also run this blog, which I like to view as a source of news, tips, tricks, and inspiration for scrapbooking and paper-crafting of all kinds. 

Since the topic of this blog hop is “All Treats, No Tricks”, I thought I would share a couple of Halloween treat holders with you today.  These are both really simple projects, and require very little supplies.  They’re great for party favors or to surprise your coworkers.  I filled them with my favorite treat, Reese’s Cups.


The small holder is super simple and made from a 6” x 6” square of double-sided paper using Stampin’ Up’s Simply Scored Diagonal Plate.  The instructions are available for download by clicking here.


The other two boxes are variations of the Criss-Cross Box created by Nicole Heady for PaperTrey Ink.  You can find Nicole’s box on her blog, and you can download her template there as well. 


For the spider box, I just put my treats directly inside the box, but I also wanted to show you how to make the box work for smaller candies, too, by using a clear cellophane treat bag.  Just put the bag in the box, fill with your favorite candies, and close with a pull-tab or twist tie.

Tip: I used Stampin' Up's Tiny Tag punch to make my "Boo" tag.
It's easier to punch the hole for your string before you punch your tag!


I hope you liked my projects.  If you would like to see some of my previous posts and projects, scroll down to the “Blog Archives” on the left, or you can search for posts by specific topics just below that.  Feel free to leave a comment and tell me what you think!  You can also find us on Facebook at http://www.facebook.com/craftyneighbor, on Pinterest at http://www.pinterest.com/c1ndyluhu/, or on the web at http://www.craftyneighbor.com.

Thanks so much for visiting my blog today!  Be sure to subscribe using one of the links on the left to be eligible to win one of our awesome prizes!  My contribution will be a

$50 gift certificate
and a grab-bag of embellishments!

Now, hop on over to the Very Vintage Retreat, to collect your next treat!