Showing posts with label gift bag. Show all posts

Friday, December 6, 2013

Thankful


Today’s port visit is Cozumel, and I am so very thankful to be on this wonderful island yet again.  I come here time and time again (every cruise out of Galveston stops here, I think), and I just never tire of it.  I’m not sure, but maybe it is because my stay is always so short.  I just don’t ever get a chance to see or do as much as I would like.

I’m thankful for a lot of other things, too, like the wonderful collaborators I’ve had on this cruise, Susie and Valerie, and of course our guests.  Last night, we thanked them with these cute little bags made by Valerie.  In each bag is a charm pin to remind them of our cruise.


Tomorrow will be our final day at sea before returning to port in Galveston.  Our cruise through the year is almost over, but we still have many more great projects from this cruise to share with you, so I hope you’ll stick around!

Thursday, December 5, 2013

Happy Hauntings!


After a day in Honduras, today we are visiting our second port, which is Belize City, Belize.  Today I have a treat for you.  Actually, a Trick or Treat of sorts, because our pillow gifts last night were a little spooky.

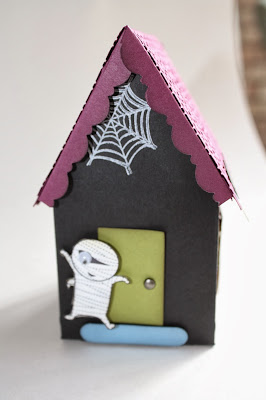
For our Halloween night of Cruising Through the Year, I made this little haunted house using the milk carton cut on the Close to My Heart Artiste Cricut cartridge.  Many of the other elements on these haunted cartons also came from Cricut cartridges, too.  A complete list of supplies can be found below.

One little note if you try to assemble one of these for yourself…I didn’t want my haunted house to look like a milk carton, so I worked in a couple of extra folds that are not marked on the Cricut cut.  I have made a video of the assembly process which I will post on this blog some time in the near future.  Until then, I’m hoping the photo below will demonstrate the extra folds.

Supplies:

Stampin’ Up Card stock:
Basic Black
Rich Razzleberry
Real Red
Pumpkin Pie
Daffodil Delight
Old Olive
Pacific Point
Whisper White

Cricut Cartridges:
George and Basic Shapes:  window
Handyman:  fence
Simply Charmed:  ghost, tombstone, bat
Close to My Heart – Art Philosophy: window frame
Close to My Heart – Artiste: milk carton

Punches:
Stampin’ Up 1-3/8” Cricle:  candy dispenser
Stampin’ UpPetite Curly Label Punch: “Lift”
Stampin’ UpWord Window: doorstep
EK Success Deco Scallop:  Roof
Martha Stewart Drippy Goo border:  windows

Stamps:
Stampin’ Up Googly Ghouls

Embossing Folders:
Stampin’ Up Square Lattice embossing folder

Button Magnets:
Basic Grey

The lid on this little treat box lifts up to reveal a hole where you can fill it with candies.  I suggest wrapped candies like Tootsie Rolls or Jolly Ranchers, etc. that will fit through the hole easily.  The lid attaches to the house a a very steep angle, and although it is glued down on one side, the side that opened had a tendency to pop up.  My solution was to use mini pancake magnets made by Basic Grey.  Two magnets go on the inside of the house on either side of the hole.  Their counterparts go behind a strip of paper on the underside of the roof.  I tried this with velcro and other fasteners, but they wound up pulling off or tearing the paper, so the magnets worked best, and only when they were separated by paper so that they could be pulled apart without tearing the paper or coming unglued.

There are a couple of items I cannot remember where they came from.  One is the skull stamp.  It was part of a mini-pack of stamps I bought for $1 somewhere.  I think the spiderweb came from there, too.  If I could find the package, I could figure out who made it, but it has somehow disappeared!  Two other items, the window frame and the pumpkin, were both Cricut cuts, but I did all my design work on the Gypsy and now I can’t figure out which cartridge it came from!  If I figure it out, I will update this post.  The door was just a rectangle with a brad for a doorknob.

That’s it for today.  I know this little house is a bit out of season, but we are cruising through the year with our pillow gifts, and next up is Thanksgiving.  I hope you enjoyed today’s project and don’t forget to come back tomorrow!

Really ugly photo showing which score marks to add/omit. Click to zoom.

Addendum 1/1/14:  
Woo hoo!  I found my little Halloween stamps that I used to make the spiderweb and the skull.  It was a "Studio G" clear stamp, Series 34.  Here's a picture of the stamp set:


Thursday, October 17, 2013

All Treats, No Tricks!


Welcome to Crafty Neighbor’s “Neighborhood Gossip” blog, a proud participant in the “All Treats, No Tricks Blog Hop”!  To start at the beginning of the hop, please visit The Little Blue House where you can learn how you can win one of 11 FABULOUS PRIZES.


For those of you visiting my little blog for the first time, please allow me to introduce myself.  My name is Cindy Murray, and I am the owner of Crafty Neighbor and Crafty Neighbor Travel.

I often call myself an event organizer, but really, Crafty Neighbor is so much more than that.  I host crops, retreats, classes, workshops, and even scrapbooking cruises and garage sales, but my real mission is to bring crafters together and support the scrapbooking and paper-crafting industries by providing fun and unique opportunities to learn new techniques, scrapbook at different venues, and meet new friends.  I also run this blog, which I like to view as a source of news, tips, tricks, and inspiration for scrapbooking and paper-crafting of all kinds. 

Since the topic of this blog hop is “All Treats, No Tricks”, I thought I would share a couple of Halloween treat holders with you today.  These are both really simple projects, and require very little supplies.  They’re great for party favors or to surprise your coworkers.  I filled them with my favorite treat, Reese’s Cups.


The small holder is super simple and made from a 6” x 6” square of double-sided paper using Stampin’ Up’s Simply Scored Diagonal Plate.  The instructions are available for download by clicking here.


The other two boxes are variations of the Criss-Cross Box created by Nicole Heady for PaperTrey Ink.  You can find Nicole’s box on her blog, and you can download her template there as well. 


For the spider box, I just put my treats directly inside the box, but I also wanted to show you how to make the box work for smaller candies, too, by using a clear cellophane treat bag.  Just put the bag in the box, fill with your favorite candies, and close with a pull-tab or twist tie.

Tip: I used Stampin' Up's Tiny Tag punch to make my "Boo" tag.
It's easier to punch the hole for your string before you punch your tag!


I hope you liked my projects.  If you would like to see some of my previous posts and projects, scroll down to the “Blog Archives” on the left, or you can search for posts by specific topics just below that.  Feel free to leave a comment and tell me what you think!  You can also find us on Facebook at http://www.facebook.com/craftyneighbor, on Pinterest at http://www.pinterest.com/c1ndyluhu/, or on the web at http://www.craftyneighbor.com.

Thanks so much for visiting my blog today!  Be sure to subscribe using one of the links on the left to be eligible to win one of our awesome prizes!  My contribution will be a

$50 gift certificate
and a grab-bag of embellishments!

Now, hop on over to the Very Vintage Retreat, to collect your next treat!

Wednesday, January 25, 2012

Trying to Be a Better Blogger

I know, I know.... The idea of a scrapbooking blog is that I should *frequently* post some kind of article or entry about scrapbooking.  Ideally, that would be at least once per week or something.  And yet, as I was just reviewing my post history, I see that I didn't make a single post in the months of October *or* December!  Wow.  Can I say that I was busy?

While I was poking around, I noticed that I didn't post all that many ideas or samples last year, either.  Many of my posts lately have been articles or editorials about scrapbooking or the craft industry in general.  I know...it's supposed to be a scrapbooking blog.  I really *should* have some scrapbooking samples and ideas, right?


So to make it up to you, I thought I'd share some of the projects we have been doing in our 3rd Wednesday Card/Stamp Club.  As you may know, we work on different projects each month (and usually at least one card), so with Sharon's permission, and without further ado, here are some awesome project samples for your enjoyment!


Click on the picture for more card and project ideas!

Sunday, December 26, 2010

Gift Giving for the Whole Year

I fully intended to have posted a couple of blogs in December with some great Christmas ideas, but the insanity level around here was at an all-time high and the blogs just never materialized.  I decided to not feel bad about it, after all, you’re probably too busy to read it anyway, and well, it just doesn’t really matter in the grand scope of things! 

This apparent lack of concern is a very new approach for me.  I’m actually the over-achieving, Type-A, obsessive-compulsive perfectionist of the family.  But I must say, the change in attitude has helped a lot with the stress I normally impose upon myself throughout the holidays.  I just have to keep reminding myself of the fortune cookie I got a couple of weeks ago.  It said something like, “Don’t worry about what you SHOULD do, concentrate on what you CAN.”  Great words of advice. 

So instead of worrying about the fact that half my gifts still haven’t made it to the post office or that I forgot to offer the eggnog and cider to our guests on Christmas Eve, I intend to sit back and drink that eggnog and cider myself while I watch my family play with the gifts that DID get finished.  Oh, and all those blog ideas?  Well, how ‘bout we turn them into projects and gifts you can make and use throughout the year?

For a quick and easy gift idea, try making one of these cute little gift tag sets:


These are some cute little gift tag boxes I made for teachers and a few friends.  I loved making these, they are such a simple concept and yet so versatile and VERY easy to personalize.  The original idea for these comes from the Splitcoaststampers website and were first presented to me by Stephanie G., a very talented Stampin’ Up demonstrator we know.  Later, Pam used this same concept as the basis for one of her classes on our fall cruise.  The tags can be put together in endless combinations, and I’m considering putting together some generic tag sets to use for birthdays, showers, and other gift-giving occasions.  If you want to see some more ideas along these lines, check out the Splitcoaststampers gallery.

Several of us belong to a Stampin’ Up! hostess club, and this month we learned how to make these lovely coasters/trivets.


We used Staz-on inks, Stampin’ Up! Craft Inks, Stampin’ Up Classic inks, stencils and stamps.  The tiles were baked at 350° for 10 minutes, cooled, and then sprayed with a sealant.  Felt pads on the bottom will protect your furniture.  I bundled up the four NOEL tiles in a pretty ribbon and presented them to my sister-in-law.  Monograms, names, special words, or even pretty designs can be used to personalize these for any occasion.

Speaking of monograms…


Last year, I made several monogram wall ornaments to give as gifts to my kids, nieces, and a few favorite teachers (see more in my December 2009 blog entry). 


This year, I had to make another one for my brand new nephew, Billy, and his two older brothers who live in another state, Todd and Ryan.  These are super cute and simple to make.  The cardboard letters are available at Hobby Lobby, or you can use wooden letters available at most larger craft stores.  Some 3-in-1 glue (it’s the BEST for sticking paper to chipboard!), patterned paper, and a little creativity can turn it into a very personal and lovely gift for people of any age.

Need something a little more elaborate or personalized?  What about a perpetual calendar?


I made this perpetual calendar for my mother for Christmas.  She’s a huge NASCAR fan, so I thought I’d do up her calendar in that theme.  It was a really fun challenge, and I’m really pleased with the results!  I’ve also seen University of Texas themed calendars, color-themed calendars, and really, just anything you can imagine!  If you’d like to give one of these a try, I teach it as a class (usually no more than 2 or 3 people at a time) and I provide all of your general supplies.  It’s a great deal, and you can create something completely unique!  For more information please see our website.

Okay, so you’ve made Aunt Sallee a really cute set of coasters for her sunroom.  You wouldn’t just throw it in any old box or bag would you?  This idea came from another awesome Stampin’ Up! Demonstrator (Sharon A.), what about making a super cute gift bag from an ordinary lunch sack?


Or what about making a beautiful tag?


I started making tags several years ago after another scrapbooker told me that she always makes a card with the scraps from every scrapbook layout.  She pointed out that your “theme” is already set, so are your colors…all you have to do is assemble it!  After she told me that, I started making LOTS of cards with my layout scraps.  But sometimes, there’s only so many red, white and blue cards that I need, so I decided to make tags, too.  Now, whenever I finish a page, I make a quick card and a tag.  All of these tags were made with my Cricut using a 5-inch "Tag1" shape on the Plantin Schoolbook font and various other cuts from other fonts.  The fun challenge with tags is that I sometimes try to make Christmas tags using non-traditional colors – like a pink and black snowflake card.  Some of them have turned out quite good, I think. 

So that’s it for my gift-giving, post-Christmas blog.  I hope your holiday season has been filled with all the good things in life:  friends, family, faith, food, and fun! 

Merry Christmas!
The Crafty Neighbor