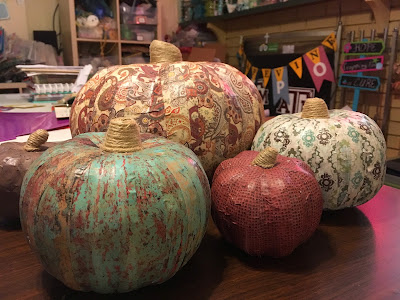
I know it’s a little late for a new Thanksgiving/Fall
project, but this one was so quick and so cute, I just had to share. I’ll admit that I did not come up with this
project on my own. I was scrolling
through Instagram one day and Hobby Lobby had posted an ad with these cute
papier-mâché pumpkins and I just had to give it a try!
I found the paper I wanted and two sizes of papier-mâché
pumpkins at Hobby Lobby, but for balance, I wanted a size in-between as
well.
That’s when I decided it didn’t really have to be a
papier-mâché pumpkin; this technique would work on plastic or other materials
as well. So I found a couple of
Styrofoam pumpkins at Dollar Tree in the perfect size. I also like that all three sizes are slightly
different shapes, so it gives it a bit of interest.
The first step in creating these beauties is to cut your
paper into long strips. I started with 1
inch, but quickly found that was a little too wide for the medium pumpkin, so
as I worked on it, I cut some of the strips in half.
On the second pumpkin, I went to ¾”
strips. The 1” strips worked just fine
for the large pumpkin.
Why does it make a difference? The pumpkin curves—not only
up and down, but side to side – and the paper is flat. If the paper is too wide it will pucker and
wrinkle as you lay it down. The thinner
the strips, the less it has to curve, and therefore, the less it will wrinkle.
The length of the strips will vary depending on the size of
the pumpkin. I found that my medium
pumpkin was about 8” from the stem down to the middle of the underside,
including a bit of overlap. I cut all my
pieces into 8” strips and was left with an equal number of 4” strips. The easiest way to decide what length you
need is to take one of your strips and hold it next to the stem while you wrap
it down the side and across the bottom. Let
it cross over the center and then fold it back the direction it came. That’s where you’ll cut it. They don’t have to be exact, either, because
they are all going to overlap each other on the bottom. So as long as it covers the bottom center of
the pumpkin, you should be good.
Unfortunately, the 12" strips weren't long enough to go all the way to the middle of the large pumpkin. So when I finished wrapping all the strips around the pumpkin, I covered the spot with a scalloped circle punched from the same paper.
Unfortunately, the 12" strips weren't long enough to go all the way to the middle of the large pumpkin. So when I finished wrapping all the strips around the pumpkin, I covered the spot with a scalloped circle punched from the same paper.
I used Mod-Podge because it’s my go-to collage medium, but you can probably use other glues. I painted a wide strip of glue onto the pumpkin and also on the back of the strip, that way you know you have good coverage. Start at the stem and wrap the strip down the pumpkin to end at the middle of the bottom. I worked on the “valleys” first, because it’s easier to cover the curved parts if you don’t have to worry about getting down into the creases.
After I did all the valleys, I made my way around the
pumpkin again, this time overlapping the paper where it came out of the
valley. If the wide curved part is too
wide for your strip of paper, just cover one side of it. The main point is to overlap the valley
strips. You might have to go around the
pumpkin a third, fourth or even fifth time, depending on how wide those curved
parts are, and how big the pumpkin is.
Once I covered the body of the pumpkin, I let it dry overnight
and then covered the stem with hemp. I
covered the entire stem with redline tape and then started winding the hemp
around. Start at the top of the stem and
stick the twine down to the middle. Wrap
it tightly around the stem, leaving no gaps.
When you get to the bottom of the stem, find a good spot to cut it and
tack it down so that it’s tucked up close to the base of the stem.
I also gave my pumpkins a spray of polyurethane to finish
them off and protect the glue from getting sticky in humid weather. You can add to the pumpkins by attaching silk
or paper leaves, or even bling.
And here is another view of the finished project.
And here is another view of the finished project.
I hope you enjoyed my fun little project – I sure had fun
making it!
Until next time, go do something crafty!
Cindy


