Friday, October 1, 2021

Handmade Halloween Happiness!


I’ve always loved holidays. Around the Murray house, any holiday is a good excuse to fix up the house, dress up the kids (and me!), and whip up some good food. Halloween is no exception, and I’ve spent a lot of that “dress up” time coming up with some fun costumes for my kids and myself. In fact, it’s been a sort of challenge to see what I can come up with each year. 

I think it all started when I was a kid. Back then, there weren’t so many ready made costumes…just the plastic masks that had cutouts for your eyes and even tinier holes for your nose and mouth. My mom would often buy us the mask (they didn’t cost that much) and then make our costumes to go with it. The earliest one I remember was (I think) either a Cinderella or Snow White mask, and my mom took an old curtain, some glue, and silver glitter and turned it into a cape.  I was a princess! But I actually have a photo of one that’s even older…me in a white-haired wig.  I wasn't even a year old yet, and I have no idea what I was supposed to be. Later, someone made matching clown costumes for my aunt and me and we just continued the tradition until it was time to make costumes for my own kiddos.

Making your own costumes does NOT have to be hard, and believe it or not, it very rarely even requires any sewing. One of my most famous costumes (or maybe I should say “infamous”) was the zebra outfit I wore to work one year. It was HOURS before anyone figured out who I was, and so I won the prize for best costume. All it took was a zebra stripe Uni-tard, black boots, black gloves, some black and white face paint, and a banana hair clip – all of which I already owned.


My daughter loves homemade costumes as much as I do. When she was a child, I once rolled her hair in curlers, slathered on white face-paint, dressed her in PJs and a robe with house shoes and called her a “Housewife”, complete with rolling pin. She’s also been a princess, a bug, a fairy, a mouse, a witch, Dorothy from the Wizard of Oz, a cheerleader, a clown, a gypsy, a hippie, and a punk rocker (twice). 


 My son has been a bunny, the devil, a pumpkin, a “California Raisin”, the Karate Kid, a soldier (after 9/11), a vampire, a Dickens-esque ghost, and a musketeer, but one of our favorites was the year after the Olympics when he dressed as Michael Phelps, including 7 shiny gold medals.


The internet (and especially sites like Pinterest), has really been a great resource for finding ideas for homemade costumes. It’s a lot of fun, to see how much detail you can add using things you already have. I’m trying to decide what I want to be this year when I open the door for all my neighborhood trick or treaters. How about you? Share your costume ideas in the comments, or start a discussion over in our Crafty Neighbor Facebook discussion group: Crop and Craft Events.


Until then, Happy Hauntings!

Cindy


Sunday, August 1, 2021

Documenting Your Travels on the Go

I have a confession. Scrapbooking and travel might be my passion, but I am NOT always very efficient at getting my trips documented. I always start out with the best of intentions, but after buying all the pretty travel kits with coordinating papers, my photos and memorabilia always seem to wind up in a box somewhere in my already over-crowded craft room. And that’s where it stays.


A few years ago while hosting a scrapbooking cruise, I had the opportunity to watch two very talented ladies in our group as they created a scrapbook of our cruise — documenting the very cruise we were on! They were even able to print their photos right there on the ship using a thumb drive and the photo kiosk! I was so amazed by their project that I decided right then and there that I had to document my next cruise the same way. 


Since then, I’ve documented several trips in this manner, and I get a little smarter and more efficient each time. It’s really all about planning ahead and knowing what you will need to get the results you want. Here are some of my tips for documenting travels on the go:


  1. Choose your format. It doesn’t really matter what format you use, but some things to keep in mind are the size of the album (how much space will it take up in your luggage) and the style of pages (are the pages plain, patterned paper, or do you have to make them?). I have used Smash Books, travelers notebooks, pre-made travel journals, and even wallet calendars. I’ve even used the Project Life app to make digital pages on the go.

  2. Choose your supplies. I have traveled with as little as a pair of scissors, pencil, colored pens, adhesive, and some washi tape. If I want to embellish more, I might bring some die cuts or ephemera in a travel theme, stickers, and a few journaling cards or labels. If I’m feeling really crafty, I’ll bring a few themed stamps, maybe a set of alpha stamps, and some coordinating paper for matting, etc. It’s really up to you what you want to bring and how you like to document.

  3. Decide how you will print your photos. As I mentioned, the two ladies on the cruise used the photo kiosks on the cruise ship to print their photos on the fly, but what if you aren’t on a cruise? Small printer technology has improved greatly over the past few years. My first micro-printer was my HP Sprocket, which prints 2”x3” photos on an adhesive-backed paper. The quality isn’t all that great, but it’s very easy to use and inexpensive to operate. I still use it for small prints. My next printer was the Canon Selphy, which prints 4”x6” full-color photos.  I love the quality of the photos on the Selphy, but it sometimes annoys me that it’s not true 4”x6” and creating custom sizes or collages can be challenging. Epson also makes a small portable photo printer that is capable of printing up to 5”x7” photos, but it’s quite a bit larger and also more expensive.

  4. Map out your use of the album. Determine how many pages you will use for each day or activity. This is especially important if you are using a travelers notebook or other format that has a fixed number of pages. Do you want to fill the whole album? Or do you plan to add other trips to the book? I often use a pencil to lightly note what each page will be used for, or to allocate a set number of pages for each day.


  5. Keep a notepad handy.  I usually carry a small spiral or notepad in my purse to jot down notes about the trip on the fly. It’s a good way to keep track of where you ate dinner, what you did after lunch, that random fact about the hotel or the tour you were on. You’ll want to remember all those things when you sit down to start documenting.

  6. Keep it simple. Don’t spend too much time trying to embellish or decorate your pages. As you sit down to work on your album each day, try to get the photos inserted and captioned while trying to capture the over-all feel of the activity. The idea is to capture as much of the day into the album as possible.You can always come back and embellish more later.

  7. Relax, enjoy the process, and have fun on your vacation! Don’t stress over getting it all done, and don’t worry if you don’t have time to document. I never finish my travel albums while I’m on my trip, and that’s okay. It really is all about capturing your memories as quickly as possible before the feeling fades, but a lot of the joy comes from reliving those memories when you come back later to embellish and finish your album. It’s okay if you get behind, skip a day, or don’t document anything at all…it’s more important to enjoy your trip!  


Learning to document on the go has been a tremendous game changer for me. I get my trips scrapbooked so much faster now because of it, and the albums and travel journals that I create are so much better at capturing the experience because they are created while they are still fresh in my mind. It’s a lot easier than you think, and with a little bit of planning, you can document your trips on the fly, too. 


Want to see more travel journaling? Check out these flip-throughs of two of my travel journals:


Tell us how you document your trips:

Share Here!

Friday, July 30, 2021

Crafting When We Travel

As we wrap up July here at Crafty Neighbor, we are still focusing on crafting when we travel. I love taking my crafts with me when I travel, and I’ve been known to take crochet, embroidery, and, of course, scrapbooking along on my trips. Packing projects like embroidery and crochet are pretty straight-forward; you just need needles or hooks, thread or yarn, some scissors, and a pattern. But traveling with paper-crafting supplies can be a bit more challenging, especially if you are someone like me who likes to take everything I own. I have been known to completely fill my SUV with supplies when I head out to a retreat, but I’m trying to learn to bring less so I can get more done.

I recently went on an over-night canoe trip with my family, and my daughter and I both wanted to take our craft supplies along so we could document our trip. Since we have such limited space in our canoes (and not a lot of time for documenting), we restricted our supplies to travelers notebooks and a simple set of drawing/journaling tools. 


For this minimalist kit, I included three pens: a Tombow Mono Twin, and two Tombow brush pens, a hard tip and a soft tip. I also brought several pencils of varying hardness, including a .9 mm mechanical pencil, 4H and B graphite pencils, 3 black charcoal pencils (4B, 5B, and 6B), a white charcoal pencil, and a white 2B colored pencil. I also threw in a pencil sharpener, a Tombow Mono eraser, and a couple of bulldog clips to hold the notebooks open/closed as necessary. Since we were in canoes, we stored them in water-proof zipper bags. The idea behind this kind of kit is to do more drawing and journaling. I can still leave room for photos, but I will add those later. Mainly I just want to get the stories into the book before I forget them.


For other kinds of travel, I will often add other supplies to my kits. A cruise to the Bahamas for an Aggie Mom’s fundraiser in 2016 allowed me to bring my dual-tipped Stampin’ Up markers (which I am slowly replacing with Tombow markers), scissors, glue pens, Wink of Stella brushes, a white Uniball Signo pen, Tombow Mono adhesive, a Xyron adhesive eraser, a corner rounder punch, a small blender sponge (for use with the markers), Scor-Tape and red line tape, a 6”x6” paper pad, StazOn ink, and a very small assortment of stamps (numbers, letters, weather, travel). In the end, I wound up with a lot of things I never used, so for later trips, I went back to a more minimalist approach with just a few items.


My travel kits have evolved a lot since then. The addition of an HP Sprocket photo printer has allowed me to add photos on the spot to my cruise scrapbooks. And since the printer runs on a USB charge, there was no need for electricity. Washi tape allows me to tape ephemera and memorabilia into the album without gluing it down. And the pens, markers, and pencils change according to whatever is my favorite at the time.


When I traveled to Las Vegas last summer with my daughter’s bachelorette party, we both took along craft supplies for documenting in our traveler’s notebooks. My kit this time included stickers, an assortment of diecuts, a Tim Holtz Tiny Attacher, a date stamp, alpha-numeric stickers, a small assortment of patterned papers, the usual pens and scissors, Versa Fine black ink, a black Uniball Signo pen, plus my watercolor pencils and my Canon Selphy printer (great for photos up to 4”x6”). What got left behind? All those colored markers, most of the stamps, the Wink of Stella, and the blender sponge. This kit fit in my suitcase with my other belongings, and has become my standard go-to kit for traveling.


Sometimes, when I am going to be crafting only for one day, I will bring a single project to work on. For instance, one year at our Think Pink crop, I brought my Christmas cards to work on. The supplies for this were very limited: cardstock, scissors, paper trimmer, adhesive, Score-Pal, ink, and a stamp. I’ve also been known to bring my planner and a few stickers, or a bullet journal and pens. I’ve also brought mini albums I made in a class and finally took the time to add photos and journaling.


Learning to take smaller kits and one-off projects has helped me get more done when I do travel. When I bring too many supplies, I find that I actually get less done because I spend more time setting up my crafts and choosing supplies and less time actually crafting. Plus it’s a nice change not to lug all those supplies around in a second suitcase or tote bag. 


You can read more about taking crafts with you when you travel in our August newsletter, which will go out on the 1st. Brandi is going to share her travel kit, and I’ll have a new blog article about documenting your travels on the go. Be sure to subscribe to the newsletter at http://eepurl.com/TZULf, and you can subscribe to this newsletter using the links on the left.

Wednesday, July 21, 2021

Attention Email Subscribers!


If you are an email subscriber to this blog, I have some bad news for you! Blogger has announced they will no longer support FeedBurner Email Subscriptions. To continue receiving new posts, please use one of the other Subscribe widgets on the left.  I am still on the hunt for a solution for email subscriptions and will share as soon as I figure it out! Until then, I hope you'll choose to subscribe in another manner!

Thanks so much!

Cindy

Social media vector created by stories - www.freepik.com

Sunday, March 14, 2021

COVID-Safe Craft Getaways

What’s the one thing you miss most while we’re going through this pandemic? Is it movie theaters? House parties? Vacations? Happy hour with friends from the office? For me, I think I would probably have to answer, “retreats.”

Not so many years ago, it seemed like a new scrapbooking retreat was opening up every month or so. They were everywhere, and they were always booked solid. For some of us, packing up our craft supplies and spending a weekend with our closest friends out in the country somewhere is one of the best stress relievers out there. After all, a retreat usually involves some good food, a fun hobby, and lots of laughs, not to mention no chores. When I finally caught on to this special sojourn, I couldn’t get enough. I was going on a retreat five or six times a year – more if you count the annual scrapbooking cruises and convention weekends. Going on a retreat was probably my favorite thing to do, and a great escape from the stress and anxiety of work, home, and family. 

Going on retreats (including conventions and cruises) has pretty much been put on hold since March of 2020. We are all spending a lot more time at home, which has brought it’s own kind of stress and anxiety along with even more need to get away from it all. And while some retreat centers have been open with limited capacity, many of us do not feel comfortable spending a weekend in close quarters with a bunch of strangers. Some people have been taking advantage of lowered capacity and going anyway, what is a high-risk, unvaccinated individual like me to do?


Last November, after a few particularly stressful weeks as a caregiver for my mother, I turned to my friends with a desperate plea, “Please go away with me somewhere!” and that was how our “safe” retreats began. We wanted to limit our retreat to just four crafty friends who we knew had been very carefully social distancing and self-isolating throughout the pandemic. Realizing that we couldn’t control how many people came to a retreat unless we rented the whole place, we started looking for other options for a weekend stay. Enter Airbnb, VRBO, and a host of other vacation rental options.

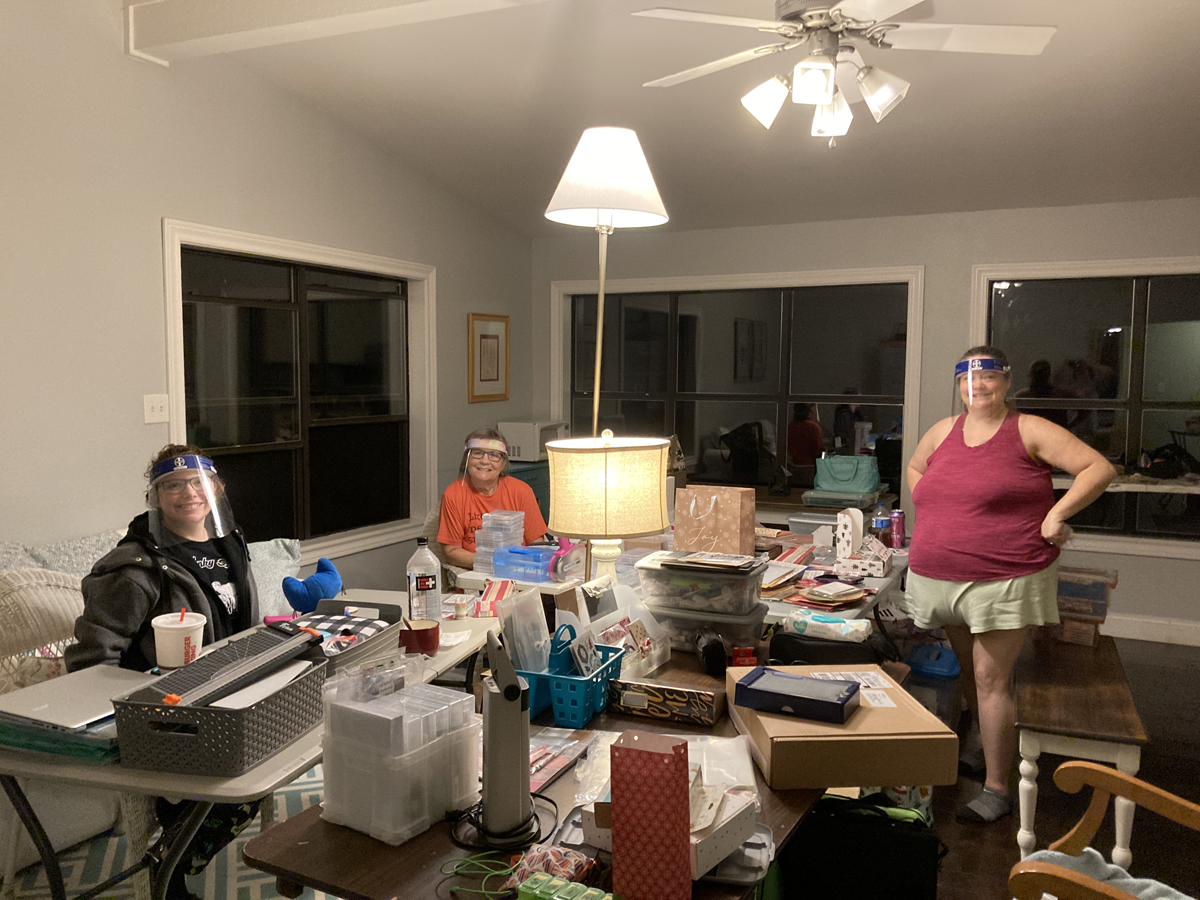
We started out wearing facemasks at our first retreat, but they didn't last long.

Our first Airbnb rental was about two hours away, and was an approximate midway point between us. We looked for a location that had a large living room or den that would accommodate four folding tables without too much furniture rearranging. We had a great time on that trip, and learned some valuable lessons for the next trip.

As of this writing, I am actually sitting at our second Airbnb retreat.  This time we chose a location closer to home, a quaint 19th century farmhouse far enough out in the country to feel isolated, but close enough to go buy ice if we needed it. We planned for the problems we encountered the last time, but this rental came with its own set of issues. We haven’t let that stop us from having a great time and enjoying this crucial respite from the daily grind.


If you are longing for the days when you escaped to a crafty retreat with your friends, think about hosting a private getaway on your own. Here are some things to keep in mind:

  • Keep the size of your group small to increase your chances of finding a space that will accommodate you – no more than 4-5 crafters.
  • Make sure you are renting the whole house, not just a room; some listings can be misleading.  READ THE FINE PRINT!
  • Look for a rental that has an open floor plan with minimal furniture to ensure you have room for tables. Keep in mind that photos can be misleading. Rooms are rarely as large as they look in the photos!
  • Contact the owner to clarify any questions you might have and to verify availability. Some owners do not update availability of the rental, especially if it is listed on multiple websites.
  • Pay close attention to lighting; one ceiling fan or a few table lamps may not be sufficient. Plan to bring your own lighting if necessary
  • Look for existing chairs or prepare to bring your own chairs. Avoid using rolling chairs on hardwood floors, as it will damage them; bring a rug or floor mat if you must use a rolling chair.
  • Bring extension cords and power strips for your lighting and electronic devices
  • Don’t forget a small trashcan and cup-holder. These are often provided at a retreat but won’t be available at a rental facility.
  • Pay close attention to the kitchen facilities. Some rentals have “apartment” refrigerators or no stove. Plan your meals accordingly.
  • Don’t be afraid to contact the owner to clarify amenities at the facility like: room dimensions, coffee pots, kitchen accoutrements, power outlet locations, local recommendations, parking accommodations, handicap accessibility, etc.
  • Think about bringing things like Ziploc bags, Tupperware, cutting boards, foil/plastic wrap, etc. You’ll need a way to pack up your leftovers. Don’t forget ice!
  • Pack light. You may not have room for all your scrapbook supplies.  Plan your projects well.
  • Don’t use paints, glitter or other messy craft supplies indoors. Don’t craft on the owner’s furniture without protective coverings. Be sure to clean up any accidents and sweep/vacuum your craft area.
  • Return all furniture to its original location.


Obviously, you can’t plan for everything, but if you ask lots of questions and keep in mind the accommodations that might not be available, you can avoid some of the pitfalls. If you plan well, you, too, can get away for a COVID-safe retreat with your besties. 

Saturday, February 13, 2021

Words Have Power


 Howdy, crafty neighbors! This month in our newsletter, Brandi Reyna will be introducing the Crafty Neighbor Craft of the Month (CotM for short?) a new theme that will be featured across all our Crafty Neighbor media from the newsletter to Facebook, blog, and Instagram. I hope you’ll enjoy this new segment; we think it will be a great way to help us dig deeper into our various crafts and widen our skills and knowledge in some unique ways.

Our topic this month is The Power of Words: Planning and Goal Setting. Back in 2012, I wrote several blog articles about using power words as part of my 365 art journaling project. (I’ve linked those articles below.) My use of power words has evolved in the last nine years, but my belief in the power of words has stayed the same. In her novel, A Handmaid’s Tale, Margaret Atwood wrote,

 “A word after a word after a word is power.”

And even Mother Theresa proclaims,

 “Kind words can be short and easy to speak,
but their echoes are truly endless.”

The idea of a power word is not a new one.  My son’s high school orchestra used power words in a unity circle before every concert.  Each student would share his or her word and the idea was that in unity, all these powerful words come together to make a whole, cohesive orchestra. 

Blogger Christine Kane uses power words in a different way.  She contends that your power words give you intent.  Each year, instead of making New Years resolutions, she does a lot of soul searching and comes up with her Word of the Year.  The word becomes her touchstone to stay focused on what’s important and to remind her of her goals. You can read more about it in that link above, and she even offers a free worksheet to help you find the right word for you.

Since 2012, I have been choosing an annual that has helped me change and grow and learn a lot about myself in the process. In 2013, I used my word as the foundation of my 365 art journaling project mentioned above, and I continued to work in that art journal using various words over the years. For the last three years, I have been doing so through a process designed by Ali Edwards called One Little Word. One Little Word is an online workshop with monthly prompts that guide you through exploring your word. I posted flip-through videos on my YouTube channel that illustrate two of the albums I created as part of One Little Word. This year, I’m working in a journal rather than a pocket album, which is providing a different experience in the creative aspect, but is just as effective at facilitating the process of growing in my word. In fact, I’ve worked many of the prompts exactly the same as in previous years, but in a flatter bullet journal style, which has really challenged my creativity. You can see most of my 2021 project on my Instagram and Facebook feeds. 

Here are a couple of examples of some of the work I’ve been doing:

My 2021 vision board.

A page in my OLW journal.

A page in my OLW journal.

A page in my OLW journal.


This year, I have also committed to exploring Lara Casey’s Cultivate What Matters Power Sheets goal planner. It’s yet another way to set some intentions and build on what you are doing with your power word. In fact, part of the prep work that goes into Power Sheets is a step that helps you find the right word. Power sheets can be started any time and there is even an undated, 6-month planner if you want to give it a try without a full-on commitment. Christine Kane’s worksheet is free, but both One Little Word and Power Sheets are paid products. These are all great places to start, but you can also do what I did when I first started – just find a word and find some projects that speak to you and let you express and explore that word. I’d be interested to see where it takes you.


A page in my Power Sheets workbook.
 

For more information:

*As an Amazon Affiliate, I earn from qualifying purchases.

Sunday, October 11, 2020

What's in Yours?

Hubby and I are huge science nerds.  We grew up in the age of moon landings, Star Trek, and Space Invaders, so it’s no secret that we are also fans of NASA. Today, Mark stumbled across a fun article relating to the Artemis program, NASA’s current program to send the first woman (and the next man) to the moon. The mission itself is pretty exciting, but one of the things that particularly caught our eye was the “What’s in Your #NASAMoonKit?” promotion.

Astronauts who travel to the International Space Station are very limited on what personal items they can bring with them into space.  Each astronaut is allowed a “personal preference kit” that takes up a maximum volume of 5” x 8” x 2”.  For the record, that’s smaller than this Creative Memories paper trimmer.


What would you put in your personal preference kit?  NASA invites you to think about what you would take to the moon and share what you would put in your #NASAMoonKit on social media. Take a picture or video and post it with the hashtag #NASAMoonKit on Instagram, Twitter, or Facebook. If they like it, NASA might share your kit on their own social media accounts or their Green Run broadcast.  Oh, and don't forget to tag @CraftyNeighbor and #craftyneighbor. I’ll be posting mine to Instagram and Facebook sometime in the next few days!


For all the rules, check the official “What’s in Your #NASAMoonKit?” website. 


Saturday, October 10, 2020

Craft Your Stress Away


Today is World Mental Health Day, and I can’t help but think that we could all use a day to pay a little bit more attention to our stress levels and spend a little more time giving ourselves some self-care. This year has been…shall we say “bizarre”…to say the least. My stress levels are so high my ears are ringing and I have to keep reminding myself to relax my neck and shoulders. Sadly, it doesn’t look like it’s going to get any better any time soon. Ugh. Everything is being cancelled, done virtually, and just messed up in general.  They’re even discouraging Halloween festivities. Luckily for us, we are crafters, so we have some great de-stressing tricks and treats (see what I did there?) right at our fingertips, so I’m here today to remind you about a few of them.

1. Craft with friends

My household can be a bit chaotic even on a good day.  With three (sometimes four) adults and two dogs, there’s always some kind of noise and commotion. I like to get away to crops and retreats where I can tune out all that mess, but with COVID, that’s just not possible. Back in March, when we weren’t able to meet in person any more, we started doing some Zoom crops (weekly on Thursdays, and frequently on weekends, too). It’s been a tremendous stress release to be able to chat with my friends, especially when we all come to realize we all have the same hopes and fears about this crazy situation. You can start your own Zoom meeting, open a Facebook “room”, or use any number of other online meeting options.  You can even join our weekly meetings; the info is available in our Crafty Neighbor Facebook Group: Crop and Craft Events. That’s where we post all of our virtual and (hopefully some day) in-person events from now on.

2. Do something mindless

Since I can’t go anywhere to get away from the stressful things in my life, I’ve started to think instead about things I can do right here at home, and that usually means veg’ing out on TV while doing something quiet and mindless. Zentangle, doodling, and coloring are great options, as is sewing the binding on a quilt, or even just cutting your scrap paper down to card or photo mat sizes. I have spent many an hour rolling balls of yarn and spools of ribbon. Just find something simple that you don’t have to think too much about.

3. Go for a quick victory

One sure-fire way to feel better is to give yourself an easy win. Finishing an unfinished project, cleaning out a drawer in your craft room, putting those finished layouts into albums, or even jotting down some ideas for your next project are all great ways to boost your mood. By checking off a task on your to-do list, you give yourself an automatic check in the “win” column, and that always feels good. It doesn't have to be a big undertaking…completing even the smallest task is enough to get the endorphins going. 

So the next time you’re feeling down in the dumps, or anxiety is making you pull your own hair out, treat yourself to one of these crafty (and fun) techniques to kick that stress to the curb! I know you’ll be glad you did! 

Tuesday, October 6, 2020

Wedding Invitations


I know I promised this a long, long time ago, and I thank you much for waiting so patiently while we got through a whole bunch of stuff. It was just too much for Christen and I to do all this work on the wedding AND find time to blog about it. I did make sure to take lots of pictures, so I hope you’ll think it was worth the wait as I start on this series of wedding posts. So without further adieu, I would like to share the invitations we made.
 

Christen and Travis chose to wait about a year before getting married so they could have time to save up for the big day and to give us plenty of time to make all the crafty things we wanted. They found the perfect venue soon after, and we kept getting asked whether they had set the date, so we decided to send out “Save the Date” cards.

I designed these myself in Photoshop, using several fonts I downloaded from the internet. These included Lightfoot ShadowedSafina FancyJazz LETPlaybillDakota, and Little Lord Fontleroy. I also used Helvetica font, which usually comes installed on most computers.

For printing, I sent my postcard to Got Print, my go-to printing company. They offer fast, convenient service, highly competitive pricing, and they even have a facility right here in North Texas. Before sending your designs for printing, you’ll want to make sure you have designed the front and back as two separate files. You may need to convert to CMYK color, so be sure to read the instructions carefully for the optimal file format and observe the bleed marks, etc. We chose full color on both sides 4”x6” standard postcard on 14 pt. Uncoated Cover paper. Choose the online Instant Processing Proof to speed up the service and keep the costs down. We paid $31.88 for 100 postcards, including tax and shipping. Larger orders offer greater savings.

We had a lot of ideas about the actual invitations, but after months of playing with a Silhouette cut file that wouldn’t cut all the way (just too intricate at that size), we gave up and ordered this die set from Amazon*. We made about 130 invitations in all, and it took us a lot longer to cut out than we had estimated. For one thing, this tiny intricate die didn’t always cut well. We wound up having to use a shim and we had to stop frequently to cut wax paper with it a few times to help it release the little bits and pieces. There are so many tiny pieces in this design that it literally shredded my Sizzix Die Brush Tool*. After that, we tried a soft-bristled toothbrush before we settled on a stiff brush from my Sonic Scrubber*. The combination of the stiff bristled brush and the above-mentioned wax paper worked well, if a bit slow.


The die we used comes in two pieces, as shown. One cuts the pocket and the other is an edge die, which has a score mark to be placed against the fold-line of your trifold invitation. This particular die was designed to create a 4" x 6" card -- NOT the standard A2 (4 ¼" x 5 ½") card most commonly used in the U.S. We searched all over for a die to make the right size, to no avail. So we decided to make do with this one. The problem we found with this was that it was very difficult to get the score marks exactly perpendicular to the length of the card and exactly where it needed to be scored since we couldn't line up the edges of the die perfectly. Rather than try to precisely place the die on the fold, we chose cut the paper into 5 ½” x 12” strips and used the die on one end. Once it was cut, we could score at the edge of the die-cut area and fold it inward before trimming to the desired length…in this case, a standard 4 ¼” x 5 ½” card. So basically cut first, score, then trim.


The pocket die also contains score lines to help with construction. Simply fold the tabs inward and add adhesive before sticking it to the right-hand flap of your card. I used ¼” Scor-Tape* for a sturdy hold. 


The remaining parts inside the card were printed on my laser printer using Stampin’ Up Very Vanilla paper and a brown-toned ink using the following fonts: Imprint MT ShadowBell MT, and Octavina Swash. The Octavian font came as a bundle I purchases a while back from FontBundles.net, however it is also available for free on various font websites. The paid version offers contextual and stylistic alternates for many of the letters. We also added a text embellishment from the Type Embellishments One LET font. Embellishments like these are fun to play around with, and sometimes you can create lovely embellishments by combining two or more into a single arrangement. 


Inside the card, we included the formal invitation (on the left) and a Details card and the RSVP card in the pocket on the right. Right before we sent the invitations, we decided to also add a COVID statement/request as another item in the pocket to remind our guests to wear masks. 

The invitation was held together with a 1” belly band, trimmed to size. The “buckle” on the band was created with Mirri Lava metallic rose gold paper from The Paper Cut and the Artisan Label punch from Stampin’ Up. The punch is discontinued, but there are many fine dies and punches that would work just as well. The inner part of the buckle was printed on Stampin’ Up Very Vanilla on my laser printer using the Little Lord Fontleroy font again. I simply built the design using multiple layers of boxes and text boxes, moving each layer around until I had it where I wanted it. It’s hard to tell from the photo, but it was actually printed in black and then Travis (my new son-in-law!) ran it through my Heidi Swapp Mini Minc* to foil it in Teal*.


The other products we used to create the invitations were:

Bazzill paper in the color Blue Oasis, which I ordered from my good friend and former Crafty Neighbor instructor, Karrie Allen at Scrapp’n Savvy in Conroe, Texas.


Kraft Cardstock Paper from Hobby Lobby* 


One more little thing...because of the weight and thickness of the complete invitation, we had to add more postage when we took them to the post office.  My advice...put them all together and take one to the post office to be weighed before you put any postage on them...there might be a single stamp in the right denomination!


I hope you’ve enjoyed this little tutorial on making these lovely and lacy wedding invitations!  I’ll be posting more of our wedding crafts and other tips and projects soon. Don’t forget to like and subscribe to this blog so you don’t miss out!

*Here are links to many of the products I used. As an Amazon Affiliate, I earn from qualifying purchases.

&nbsp &nbsp &nbsp &nbsp &nbsp &nbsp


Monday, September 28, 2020

2019 December Daily

 I just spent the weekend in my old hometown working on getting my mom’s belongings moved into storage. I can’t remember if I posted about it (pretty sure I did), but Mom has been living with us since January. She has dementia, and her care occupies a lot of my time. I’m not quite sure how we did it, but my daughter, Christen, and I somehow managed to pull off a really nice wedding with tons of handmade decorations, bouquets, and more. And all of it while we were under lockdown and social distancing orders due to COVID-19. I’ve been trying to get around to posting more of those projects, but it just hasn’t happened yet. So all this to say that I finally found a solution, and I’m hoping there will be more posts on here soon, and that they will be more regular in frequency!

One of the projects I’ve been meaning to get around to posting is my 2019 December Daily project. This was the first time I’ve participated in the popular challenge hosted by Ali Edwards, and I have to say I had the besttime! I finished my album in January, and I even recorded a flip-through video, but then I never could find the time to edit it. Now the 2020 December Daily project is fast approaching and it seems like everyone is posting their flip-throughs as part of the #donebydecember challenge created by Ali’s design team. The idea was to prompt everyone to actually finish their projects, and it guilted me into finally editing this video while traveling home.


Sorry for the lighting…it’s a work in progress! Here’s some still photos of some of the projects:


I hope you enjoyed my little flip-through and I hope you’ll come back for more crafty projects here on my blog and on my YouTube channel. Until then, I’d love to hear about some of your unfinished projects. Tell us about it in the comments below!