After a day in Honduras, today we are visiting our second
port, which is Belize City, Belize.
Today I have a treat for you.
Actually, a Trick or Treat of sorts, because our pillow gifts last night
were a little spooky.
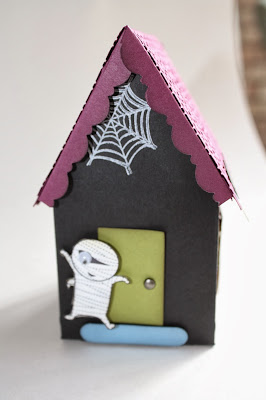
 For our Halloween night of Cruising Through the Year, I made this little haunted house using
the milk carton cut on the Close to My Heart Artiste Cricut cartridge.
Many of the other elements on these haunted cartons also came from
Cricut cartridges, too. A complete list
of supplies can be found below.
One little note if you try to assemble one of these for
yourself…I didn’t want my haunted house to look like a milk carton, so I worked
in a couple of extra folds that are not marked on the Cricut cut. I have made a video of the assembly process
which I will post on this blog some time in the near future. Until then, I’m hoping the photo below will
demonstrate the extra folds.
Supplies:
Stampin’ Up Card stock:
Basic Black
Rich Razzleberry
Real Red
Pumpkin Pie
Daffodil Delight
Old Olive
Pacific Point
Whisper White
Cricut Cartridges:
George and Basic Shapes:
window
Handyman: fence
Simply Charmed:
ghost, tombstone, bat
Close to My Heart – Art Philosophy: window frame
Close to My Heart – Artiste: milk carton
Stampin’ Up 1-3/8” Cricle:
candy dispenser
Stampin’ UpPetite Curly Label Punch: “Lift”
Stampin’ UpWord Window: doorstep
EK Success Deco Scallop:
Roof
Martha Stewart Drippy Goo border: windows
Stamps:
Stampin’ Up Googly Ghouls
Stampin’ Up Square Lattice embossing folder
Button Magnets:
Basic Grey
The lid on this little treat box lifts up to reveal a hole where you can fill it with candies. I suggest wrapped candies like Tootsie Rolls or Jolly Ranchers, etc. that will fit through the hole easily. The lid attaches to the house a a very steep angle, and although it is glued down on one side, the side that opened had a tendency to pop up. My solution was to use mini pancake magnets made by Basic Grey. Two magnets go on the inside of the house on either side of the hole. Their counterparts go behind a strip of paper on the underside of the roof. I tried this with velcro and other fasteners, but they wound up pulling off or tearing the paper, so the magnets worked best, and only when they were separated by paper so that they could be pulled apart without tearing the paper or coming unglued.
There are a couple of items I cannot remember where they
came from. One is the skull stamp. It was part of a mini-pack of stamps I bought
for $1 somewhere. I think the spiderweb
came from there, too. If I could find
the package, I could figure out who made it, but it has somehow
disappeared! Two other items, the window
frame and the pumpkin, were both Cricut cuts, but I did all my design work on
the Gypsy and now I can’t figure out which cartridge it came from! If I figure it out, I will update this
post. The door was just a rectangle with
a brad for a doorknob.
That’s it for today.
I know this little house is a bit out of season, but we are cruising
through the year with our pillow gifts, and next up is Thanksgiving. I hope you enjoyed today’s project and don’t
forget to come back tomorrow!
 |
| Really ugly photo showing which score marks to add/omit. Click to zoom. |


No comments:
Post a Comment